
This article documents the process of upgrading existing communities. Before starting your upgrade:
- Review upgrade notes
Check current and previous (if upgrading from previous major version: 10, 11) upgrade notes listed the release notes to see if you are impacted by any changes that should be reviewed before or after an upgrade. - Check system requirements
Confirm you have all the required system requirements. - Take backups
You should ensure you have backups before starting an upgrade so you can roll back if anything goes wrong in the upgrade process - Acquire updated license
If running on a commercial edition of Community, ensure you have a license with support for the new version. This can be obtained from our Support team. - Acquire installation package
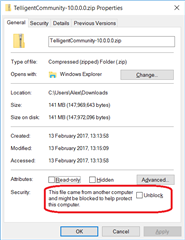
After downloading, make sure to unblock the package by right clicking on it and choosing properties. At the bottom of the window may be an option to unblock the file - Click the button or check the box (depending on your version of windows) then click OK. If you don't see an option to unblock the file, then you're good to go.
1. Stop Services
Before proceeding with an upgrade, you must ensure that the Website and Job Server services are not connecting to the database. The easiest way to do this is to stop the Job Server windows service, and to stop the website in IIS.
As an alternative to stopping the website, you may wish to put an app_offline.htm file in the root of your old website. When IIS sees this file, it will return that file as a maintenance page to all users requesting your community.
2. Upgrade Search
When upgrading to Community 12 for the first time, a full re-index is necessary. On service releases, you do not need to re-index or update Solr files unless explicitly stated. To install the new version of search, refer to the Install Search section of How Do I Install Community
If you are upgrading from Community 9.x or below, note that search no longer requires Apache Tomcat and it can be removed.
3. Move Filestorage
You may have the filestorage folder within you website directory. If so, its highly recommended to move your move filestorage directory to a location outside of the website - this improves security, simplifies future upgrades and simplifies configuring the job server.
After moving the filestorage folder, ensure that permissions are set correctly - grant your service accounts need read, write, modify and delete permissions - and that the new location is included in any backups.
4. Upgrade Database
If upgrading from a previous major version, ensure sure you meet the minimum system requirements. We recommend picking the compatibility level that matches your SQL Server version.
- Execute the script called Upgrade.sql against your database
This script can be found in theSqlScriptsdirectory of the installation package. If you encounter any errors running this script, make sure to look at the earliest errors first - later errors are often side effects of earlier errors. This should be run using an account with the default schema set to dbo.
5. Upgrade Website
Ensure .NET 4.7.2 is installed on the web server.
- Create new website directory
Create a new directory to contain the upgraded website (e.g.d:\Community\Web\). Copy the contents of theWebfolder in the installation package to this directory. - Configure connection strings:
Open the connectionstrings.config file, and update the connection strings to match your environment.- SiteSqlServer- use the same value as in the
connectionstrings.configfor your old website. - FileStorage: The path to the folder or UNC share used for filestorage.
- SearchContentUrl: The url to the solr core containing the main content index. Typically this will be
http://YOUR-SEARCH-SERVER:8983/solr/telligent-content/ - SearchContentUrl: The url to the solr core containing the conversation index. Typically this will be
http://YOUR-SEARCH-SERVER:8983/solr/telligent-conversations/ - SiteUrl**: The fully qualified url of your community, including the proper protocol(http/https) (e.g. https://yourcommunity.com).
** As of version 11.0, the Site Url is no longer set via the administration area of the site nor via any configuration file outside of the connectionStrings.config file. Any previously configured value from version 10.X or earlier will not be carried over and must be set. If your connectionStrings.config file does not contain a SiteUrl entry you will need to add one like the one below, replacing https://yourcommunityurl.com with the correct fully qualified Url to your community. Also remember this change must also be applied to your Job service.<add name="SiteUrl" connectionString="http://yourcommunityurl.com" />
- SiteSqlServer- use the same value as in the
- Re-install any customizations:
If you made any customization (e.g. custom plugins), you'll need to re-install these to the website instance - Update communityserver_override.config
If you have acommunityserver_override.configcontaining entries to change the filestorage path or solr url (such as the following), remove those entries - this configuration has been moved toconnectionStrings.configin version 10.0. If there are no other entries in the file, you can delete the file completely.<Override xpath="/CommunityServer/CentralizedFileStorage/fileStoreGroup[@name='default']" mode="change" name="basePath" value="d:\Telligent\Filestorage" /> <Override xpath="/CommunityServer/Search/Solr" mode="change" name="host" value="http://localhost:8080/solr/content/" />
- Grant permissions on new website directory
The account your IIS Application Pool runs needs to be granted "Read and execute" permissions on this directory. DO NOT grant it higher permissions such as "Modify", "Write", "Delete" or "Full Control". - Update IIS to point to new website
In IIS Manager find the website running your community. Right click on it and go to Manage > Advanced Settings. Change the Physical Path to the directory created in step 1.
6. Upgrade Job Service
If upgrading from a version previous to Community 8, you'll need to uninstall the old Job Scheduler service and install the Job Server from scratch as described in How Do I Install Community instead of the following instructions.
- Remove contents of existing job server
Remove all the contents of the existing job server installation directory. - Install new job server files
Once the folder is empty, copy the contents of theJobServerfolder from the installation package.
DO NOT simply copy the new files over the old ones - this may leave behind orphaned files from old installations which can cause hard to troubleshoot errors. - Copy connectionStrings.config from website
Copy theconnectionStrings.configfrom your website to configure the data - Run Healthcheck
Run theHealthcheck.ps1script to ensure your job server is configured correctly. If any errors are encountered, fix them. - Re-install any customization to the job server
If you made any customization (e.g. custom plugins), you'll need to re-install these to the new job server instance - Start Service
7. Upgrade Reporting
If you are upgrading a version previous to 10.2, refer to the 'Install Community Reporting' section of the full installation instead of the following instructions.
- Execute the script called Upgrade.sql against your database
This script can be found in theReportingETL\SqlScriptsdirectory of the installation package. If you encounter any errors running this script, make sure to look at the earliest errors first - later errors are often side effects of earlier errors. - Backup your connectionStrings.config file from you existing Reporting ETL directory.
- Remove contents from your existing Reporting ETL directory.
Once the folder is empty, copy the contents of theReportingETL\ETLfolder from the installation package DO NOT simply copy the new files over the old ones - this may leave behind orphaned files form old installations which can cause hard to troubleshoot errors. - Copy your connectionStrings.config file over that you backed up earlier.
8. Upgrade Video Transcoder
- Download the latest version of video transcoder. If you are currently on the same version you do not need to upgrade this service. If the version is different, follow these instructions to install the new version.
9. Upgrade Socket Bus
If you only have one web server, you don't need the socket bus component. If upgrading from Telligent Community 9.x or 8.5.x, make sure .NET 4.7.2 is installed on the socket bus server prior to upgrading. If upgrading from Community 8.0.x or lower you won't have an existing Socket Bus installation to upgrade - Install the Socket Bus as described in How Do I Install Community instead of the following instructions below.
- Stop the Service
- Remove contents of existing socket bus:
Remove all the contents of the existing socket message bus directory. - Install new socket bus files:
Once the folder is empty, copy the contents of theSocketMessageBusfolder from the installation package DO NOT simply copy the new files over the old ones - this may leave behind orphaned files from old installations which can cause hard to troubleshoot errors. - Start Service
10. Review User Experience Changes
If there were any user experience updates as part of the upgrade, a system notification will be sent to the administrators of the community to provide next step options. For more details about upgrading the user experience based on these options, see How do I upgrade the user experience of my community?
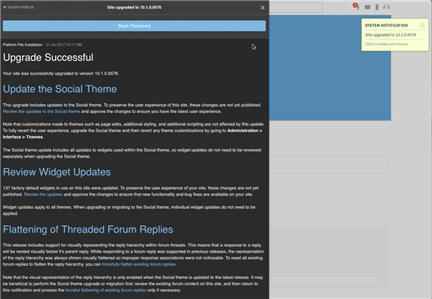
Note that it is highly recommended to go through the User Experience update process. This process is necessary for reviewing theme and widget updates that are included with the upgrade.