
Community can be run as an Azure Web App using an Azure SQL database, Azure Service Bus, Azure Storage account and Azure Web Jobs. This guide will assist in helping you understand the technologies being used and where they need to be deployed in Azure, however there is an expectation that your organization understands how Azure works, its components and infrastructure, and utilization of the Azure portal.
Note: Verint and Microsoft highly recommend premium level Azure packages.
Limitations
Currently, Azure is only a supported solution for a new community running version 10.1 or later. There is currently no supported migration path from an on-premises installation of Community to an Azure based installation unless you are currently running version 10.3 or higher and only if you currently use the default local filesystem for file storage.
You will still need to have at least a single windows virtual machine(VM) to install and run search (Solr). This machine should only be accessible by the website and job service, not publicly.
Planning
It is important to plan out your architecture before building it as it requires a functional knowledge of Azure and how to configure all aspects of Azure topology. This guide will go through the components needed and the recommendations from Verint and Microsoft for Community to run in Azure. To ensure a secure, stable and efficient infrastructure you will need to understand parts of Azure that are beyond the scope of this article.
The biggest consideration is that Community requires a mix of App Services and at least (1) Virtual Machine (VM). The App Services need to be able to communicate with the VM while still being available over the internet publicly, however the VM itself must not be accessible.
Required Components
Azure Web Application (Web App)
This is where the actual Community web components will be deployed. Refer to the Microsoft Azure documentation for App Service sizing. See graphic example below from the Azure documentation. At minimum, the Premium App Service plan P1v3 is required*. Basic and Standard App Service plans are not supported.
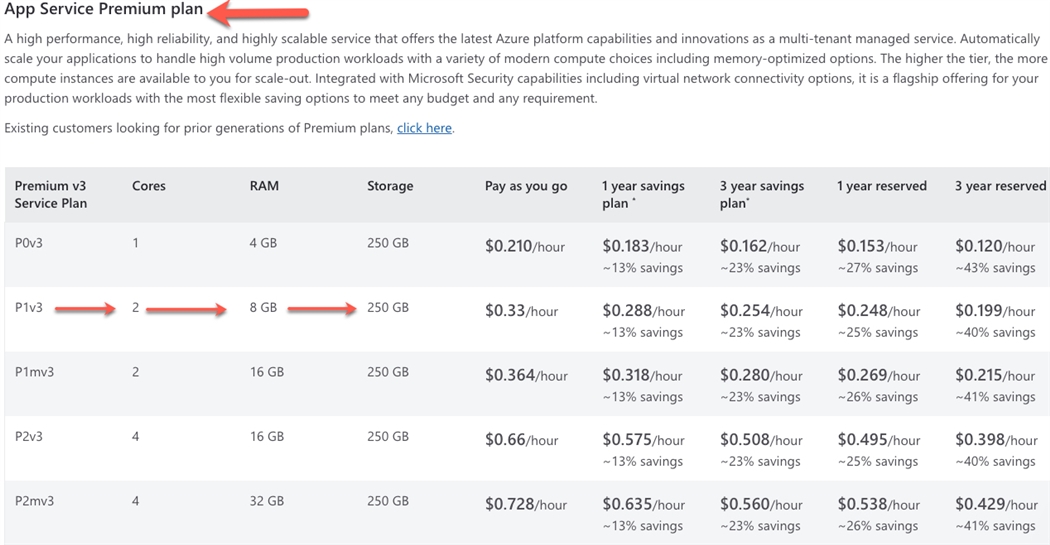
*Community is designed to scale horizontally and/or vertically. Use your Azure monitoring tools to determine if more Cores, RAM or Storage is required for your use-cases under peak utilization periods.
Create a new Web App in Azure App Services.
Additional Information to deploying Azure Web App can be found below:
Quickstart: Deploy an ASP.NET web app - Azure App Service | Microsoft Learn
Once the Web App is deployed, please verify the application settings as following:
- .NET Framework is set to version 4.7 (or higher)
- Disable 32 bit to ensure 64 bit is ON
- Web Sockets are ON
- Always On is set to ON (Note: Not all Apps Service Plans have Always On as an option)
ARR Affinity is set to OFF
The above settings can be found at:
Open the Newly Created App > Left Navigation Expand Settings > Click on Configuration.
Other options can be left in their default state. Once set up be sure to STOP the Web App itself.
Job Server
The job server runs as a continuous Azure Web Job that you configure as its own Web App. It should be configured as continuous.
- The required command file is Telligent.Jobs.AzureWebJobs.cmd and it can be found in your '[Community Install Package]\JobServer' folder.
ATTENTION: Be sure the Web Job remains in a stopped state.
SQL Database
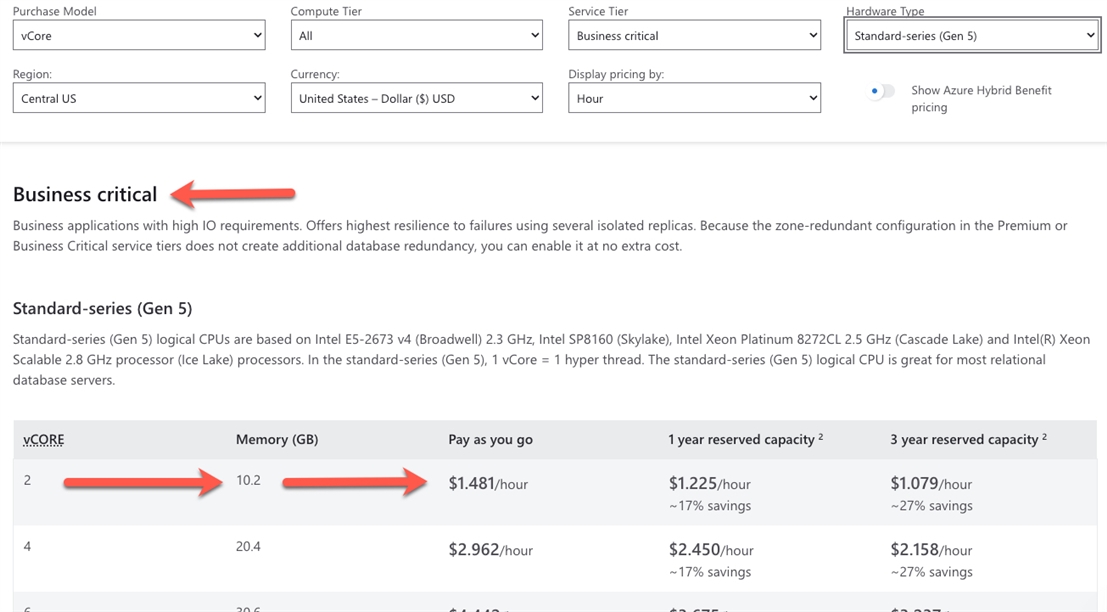
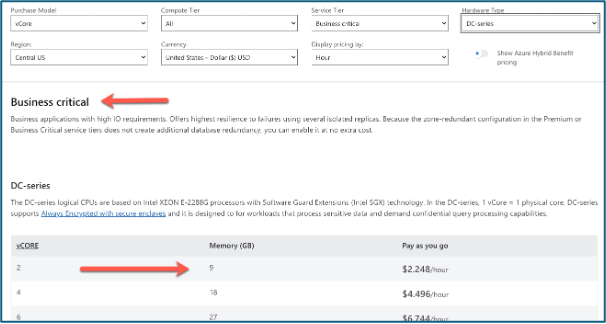
The database portion of the community utilizes an Azure SQL database. Refer to the Microsoft Azure documentation for SQL Database sizing . See graphic example below from the Azure documentation. Service Type Business Critical is best suited for high IO requirements. The Hardware Type: Standard or DC-Series is at your discretion.
Your community requires a dedicated SQL database (it should not be shared with any other applications) but can share a SQL Server. Never make alterations to the database schema even if a third-party tool or Azure itself makes recommendations.
Or
When configuring a SQL database be sure to:
- Ensure private end-points is configured.
More Details about connecting the SQL using Private Endpoint: Tutorial: Connect to an Azure SQL server using an Azure Private Endpoint - Azure portal | Microsoft Learn
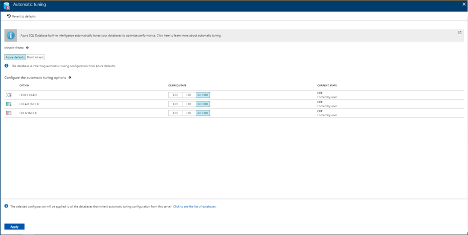
- Automatic Tuning options for FORCE PLAN, CREATE INDEX, and DROP INDEX are set to OFF for their desired state.
To manage the automatic tuning on Azure SQL Database, navigate to the server in the Azure portal and then select Automatic tuning in the menu. It would look something like below:
- Do not use INHERIT to ensure these settings are not accidentally applied to the server.
Service Bus
There is only one service bus option supported when running Community in Azure: Azure Cache for Redis is required for performance reasons along with the benefit of being a distributed cache. Refer to the Microsoft Azure documentation for Azure Cache for Redis sizing . See graphic example below from the Azure documentation. Service Tier Premier is best suited for increased bandwidth and reduced latency. Cache Name is at your discretion based on projected Number of Client Connections
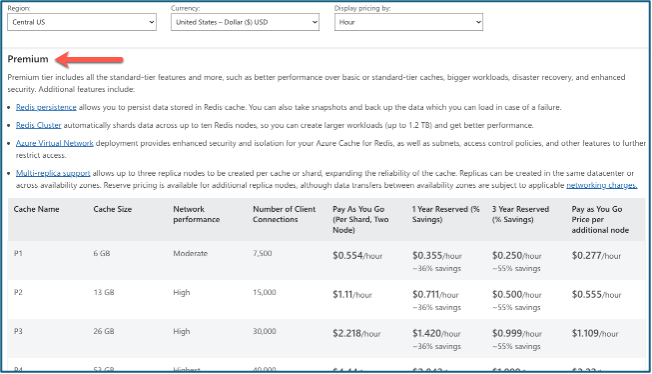
Azure Cache for Redis
Azure Cache for Redis is required due to being a performant, managed service but you can use other Redis services within Azure if you are comfortable managing those instances. Azure Cache for Redis configuration recommendations:
- Service tier: Premier is recommended in production due to increased bandwidth and reduced latency.
- Peristant: Disabled
- Version: Latest
- Connectivity: Virtual/Private
- Note: You should periodically monitor your instance to see if an upgrade is necessary.
More instruction on Azure Cache for Redis: Quickstart: Create an open-source Redis cache - Azure Cache for Redis | Microsoft Learn
Storage Account
The Centralized File Storage (CFS) portion of your community is housed in a Azure storage account you will need to create. Refer to the Microsoft Azure documentation for Azure Blob Storage sizing. See graphic example below from the Azure documentation. Premium Storage is required for low and consistent latency.
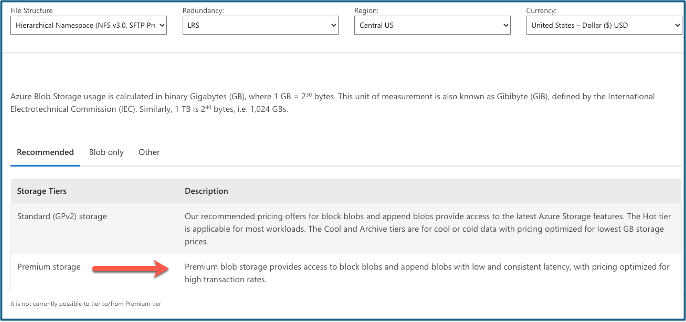
This storage account needs to be dedicated to your community and not utilized for any other application or other storage purpose. Community manages the contents of the storage account and therefore, unless directed by support, you should never manually manipulate the contents of the storage account or configure it outside of the recommended settings outlined below:
- Configure the storage account as "Blob Storage", not general purpose.
- You will get an option to select the Performance on Basic Tab during Storage Account creation.

- Production storage accounts should always be on a "Hot" tier.
- You also need to specify if the Storage account is being created as – Page Blob or Block Blob.
Migrating Your Files to Azure
If you are currently running version 10.3 or higher and you already have an existing community that uses the default local file system for file storage you can migrate files to Azure.
CDN
It is highly recommended you place your storage account behind a CDN. CDNs offer expanded capabilities and features such as compression that blob storage directly does not. You can create a new CDN end point directly from the storage account itself. Be sure to note the endpoint URL for later use.
Alternatively, you could also refer to the below documentation for creation of Azure CDN:
Quickstart - Create an Azure Content Delivery Network profile and endpoint - Azure Content Delivery Network | Microsoft Learn
Search
As noted previously, search currently does not utilize any Azure specific services or features. It must be installed on a Windows Virtual Machine powerful enough to handle the search traffic with enough disk space to store the search index. This server should never be accessible over the internet publicly. It does however have to be accessible to the Web App and Jobs.
Because search is run on a virtual machine, its installation is no different than installing it on a windows machine on-premises and those instructions should be consulted.
See tables at URL below
https://azure.microsoft.com/en-us/pricing/details/virtual-machines/windows/
Deployment
Preparation
It is assumed at this point you have you created the infrastructure as defined above and have all the components in place. If not please review the required components again and setup as necessary.
Configure Connection Strings
If you are used to on-premises installations you are familiar with having to setup connection strings in the connectionstrings.config file. In an Azure deployment, all the connection strings are stored as part of the Web App and configured in the portal. Access the Web App's application settings and locate the "Connection Strings" section. You need to add and configure the keys below.
***DO NOT SET the Slot setting for any key. It should remain unchecked
| Name | Value | Category |
| SiteSqlServer | The connection string value of the SQL Database. You can obtain this from the connection strings area of the SQL database itself. Be sure to substitute the correct name and password. | SQL Database |
| AzureServiceBus | The connection string to the service bus you configured. It can be copied from the access keys area of the service bus instance. (Note: This is not necessary if using Azure Cache for Redis) | Custom |
| AzureServiceBusTopic | A user defined string that will be used as the topic in the service bus. A good value to use is the name of your community. | Custom |
| AzureFilestorageContainer | The connection string of the storage account created for CFS. It can be copied from the access keys area of the storage account instance. | Custom |
| SearchContentUrl | The url that points to the search index. It should be http://[solrvm]:8983/solr/telligent-content/ where [solrvm] should be replaced with the IP or DNS name or your search virtual machine | Custom |
| SearchConversationsUrl | The url that points to the search index for conversations. It should be http://[solrvm]:8983/solr/telligent-conversations/ where [solrvm] should be replaced with the IP or DNS name or your search virtual machine |
Custom |
| SiteUrl | The url your community will use. |
Custom |
IMPORTANT: Do not run web job as part of of the main Web App. Run the web jobs in their own dedicated Web App Service, you will need to configure the connection strings up on the dedicated Web App.
Prepare Web and Job Files For Deployment
- Locate your Community Installation Package and ensure the .zip file is unblocked. Extract the zip file. We will reference this folder as [Community Install Package] below.
- Download the the Azure deployment zip file. Note: For Community versions prior to 12.1, use this download.
- Ensure the file is unblocked (Right click on file -> Properties -> Unblock should be unchecked) and extract the contents.
- Copy the contents to the '[Community Install Package]\Web' folder. If prompted by Windows to merge the 'bin' folder, choose 'Yes'.
- Copy the contents to the '[Community Install Package]\JobServer' folder.
- You will be using Azure Cache for Redis, download Redis for Community.
- Ensure the file is unblocked (Right click on file -> Properties -> Unblock should be unchecked) and extract the contents.
- Copy the contents to the '[Community Install Package]\Web' folder.
- Copy the contents to the '[Community Install Package]\JobServer' folder.
- Edit the communityserver_override.config file in the '[Community Install Package]\Web' folder and un-comment the two override nodes for the fileStoreGroup.
- Configure Azure blob storage options (optional)
- cdnUrl - If you are using Azure's CDN services, edit the fileStoreGroup node with the name of "Azure" and add an "cdnUrl" attribute with the value of your CDN.
- maximumSecureFileAccessDays - The number of days secured file links are valid.
- minimumSecureFileAccessHours - The number of hours (or time window) before link expiration when a new URL will be generated. For example, if the 'maximumSecureFileAccessDays' is set to 14 days and 'minimumSecureFileAccessHours' is set to 2, the same URL will be given in requests for 14 days until 2 hours before the expiration time is up at which point a new URL is generated for the next 14 days.
<Override xpath="/CommunityServer/CentralizedFileStorage" mode="add" where="end">
  <fileStoreGroup name="Azure"
      default="true"
      type="Telligent.Evolution.Azure.Filestorage.AzureBlobFilestorageProvider, Telligent.Evolution.Azure.Filestorage"
      cdnUrl="https://yourcdn.azureedge.net"
      maximumSecureFileAccessDays="7"
      minimumSecureFileAccessHours="2"
      />
 </Override>
- Copy the just edited '[Community Install Package]\Web\communityserver_override.config' file to the '[Community Install Package]\JobServer'
- When using Community 12.1 (or newer), add the following three assembly bindings within the web.config and job server's Telligent.Jobs.Server.exe.config:
<configuration>
	<runtime>
		<assemblyBinding xmlns="urn:schemas-microsoft-com:asm.v1">
			<dependentAssembly>
				<assemblyIdentity name="Microsoft.Bcl.AsyncInterfaces" publicKeyToken="cc7b13ffcd2ddd51" culture="neutral" />
				<bindingRedirect oldVersion="0.0.0.0-5.0.0.0" newVersion="5.0.0.0" />
			</dependentAssembly>
			<dependentAssembly>
				<assemblyIdentity name="System.Text.Encodings.Web" publicKeyToken="cc7b13ffcd2ddd51" culture="neutral" />
				<bindingRedirect oldVersion="0.0.0.0-5.0.0.1" newVersion="5.0.0.1" />
			</dependentAssembly>
			<dependentAssembly>
				<assemblyIdentity name="System.Text.Json" publicKeyToken="cc7b13ffcd2ddd51" culture="neutral" />
				<bindingRedirect oldVersion="0.0.0.0-5.0.0.2" newVersion="5.0.0.2" />
			</dependentAssembly>
		</assemblyBinding>
	</runtime>
</configuration>
Installation
Database
Previously you had already created a new dedicated database, setting up your community database is no different than an on-premises installation. Connect to the database using the tool of your choice that will allow you to execute SQL scripts and do the following:
- In the Community Installation package execute Install.sql.
- Once the install script has finished with no errors, set up your community by executing the following:
EXECUTE[dbo].[cs_system_CreateCommunity]
    @ApplicationName = N'telligent',
    @AdminEmail = N'notset@localhost.com',
    @AdminUserName = N'temporary-admin',
    @AdminPassword = N'[PUT A TEMPORARY PASSWORD HERE]',
    @PasswordFormat = 0,
    @CreateSamples = 0
NOTE: As with an on-premises installation, the temporary-admin account should be removed after you have created an alternate administrative account via the community itself for security purposes.
Job Server
Using a deployment method of your choice such as FTP, deploy the contents of the '[Community Install Package]\JobServer' folder [site/wwwroot/App_Data/jobs/continuous/[Web job Name]] to the Web App's job folder. You will be prompted to override the command file as you uploaded it to create the job, this okay or you can skip it.
Note: Azure will ultimately deploy and run the job service in a temporary folder (ex. D:\local\Temp\JobsShutdown\continuous\jobs\[random.string]) which will change across restarts. For this reason, we recommend updating the logging location to a persistent location. This can be done by editing the <file> configuration elements for the <ErrorLogFileAppender> and <FullLoggingAppender> within the Telligent.Jobs.Server.exe.config file to sub-folder under the existing 'D:\home\LogFiles\' folder (e.g. D:\home\LogFiles\Community).
<log4net>
		<root>
			<level value="DEBUG"/>
			<appender-ref ref="ConsoleAppender"/>
			<appender-ref ref="ErrorLogFileAppender"/>
			<appender-ref ref="FullLoggingAppender"/>
		</root>
		<appender name="ErrorLogFileAppender" type="log4net.Appender.RollingFileAppender">
			<threshold value="WARN"/>
			<!-- <file value="Logs\errors.log"/> -->
			<file value="D:\home\LogFiles\Community\errors.log"/>
			<appendToFile value="true"/>
			<rollingStyle value="Size"/>
			<maxSizeRollBackups value="10"/>
			<maximumFileSize value="10MB"/>
			<staticLogFileName value="true"/>
			<layout type="log4net.Layout.PatternLayout">
				<conversionPattern value="%date %-5level [%thread] - %message%newline"/>
			</layout>
		</appender>
		<appender name="FullLoggingAppender" type="log4net.Appender.RollingFileAppender">
			<threshold value="INFO"/>
			<!-- <file value="Logs\log.log"/> -->
			<file value="D:\home\LogFiles\Community\log.log"/>
			<appendToFile value="true"/>
			<layout type="log4net.Layout.PatternLayout">
				<conversionPattern value="%date %-5level [%thread] - %message%newline"/>
			</layout>
		</appender>
[snip]
Web Site
Similar to job server, using a deployment method of your choice such as FTP, deploy the contents of the '[Community Install Package]\Web' folder [site/wwwroot] to the Web App's site folder.
Search
As mentioned previously, because you are installing search on a windows VM, its installation is the same as on-premise installations. See the search installation section of How Do I Install Telligent Community?. Remember your VM will need to have a Java JRE installed.
Configuring Redis (*if using Redis)
Once your Redis instance is up and the Community site is running, it is time to configure Redis for the service bus and distributed cache.
- Login to your site as an administrator and navigate to Administration (Click Pencil icon - > Administration).
- Navigate to Site -> Message Buses -> and disable (uncheck) the existing message bus and click 'Save'. This will disable the current message bus.
- In the left-hand categories, click 'Extensions' and find the 'Redis' plugin.
- Enter the host, port and credentials for your Redis instance. Once entered, select 'Enabled' (checked) and click 'Save'.
- Below is an example of this information from an Azure Cache for Redis instance
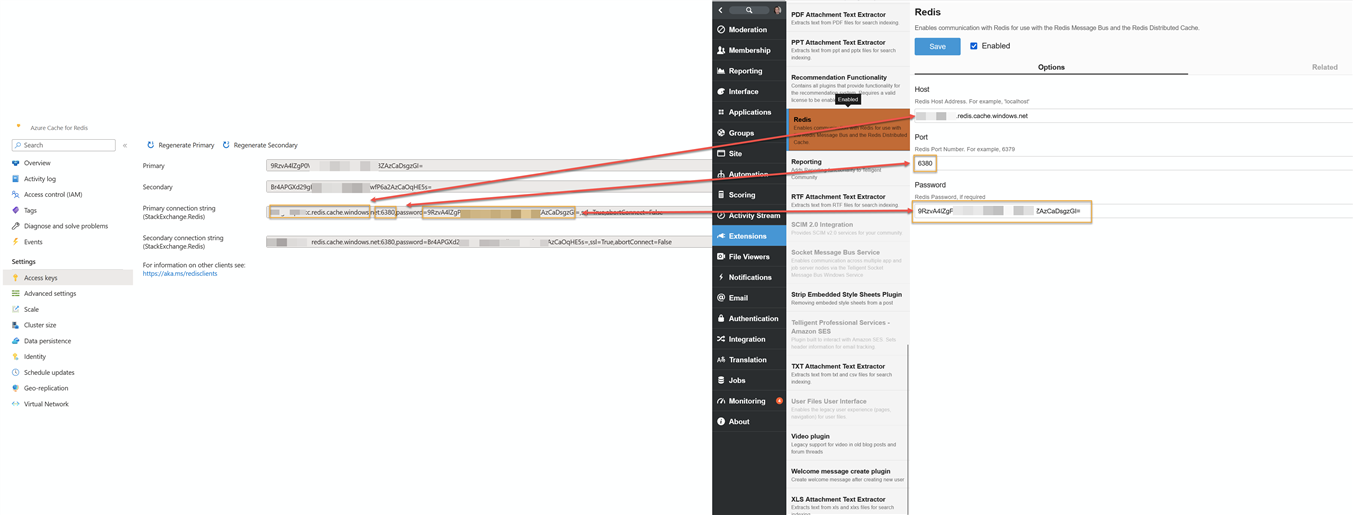
- Below is an example of this information from an Azure Cache for Redis instance
- Navigate back to Administration-> Site -> Message Bus and confirm a successful connection via the 'Diagnostics' tab.
- Note: The distributed cache will automatically be enabled.
Upgrading
You must bring your community down completely to upgrade. You cannot rely on slot deployments or upgrading single nodes at a time. The database and ALL web files must be updated for your community to function. Failure to do this could result in instability, data corruption or failure of your installation. Run backups of all components for safety.
- Repeat the section Prepare Web and Job Files for Deployment to get the new package ready. Instead of re-manipulating the community_server.config file, you can simply back up the existing one and use it instead.
- STOP the Web job for the job server. DO NOT Rely on shutting down the web app to shut it down.
- STOP the Web App
- Using FTP or another deployment option, clear the contents of the [site/wwwroot/App_Data/jobs/continuous/[Web job Name]]
- Using FTP or another deployment option, clear the contents of the [site/wwwroot] folder leaving the App_Data folder in tact.
- Connect to your database using a tool of your choice and execute the Upgrade.sql file.
- Re-Install the job the same was as you did in the Job Server section of the Installation.
- Re-Install the web files the same was as you did in the Web Files section of the Installation.
- Restart the Web App and Web Job