
Throughout Telligent Community, a common content editor is used. It is shown in different forms, but provides consistent access to content-related functionality. This guide identifies key features within the editor.
What is the content editor?
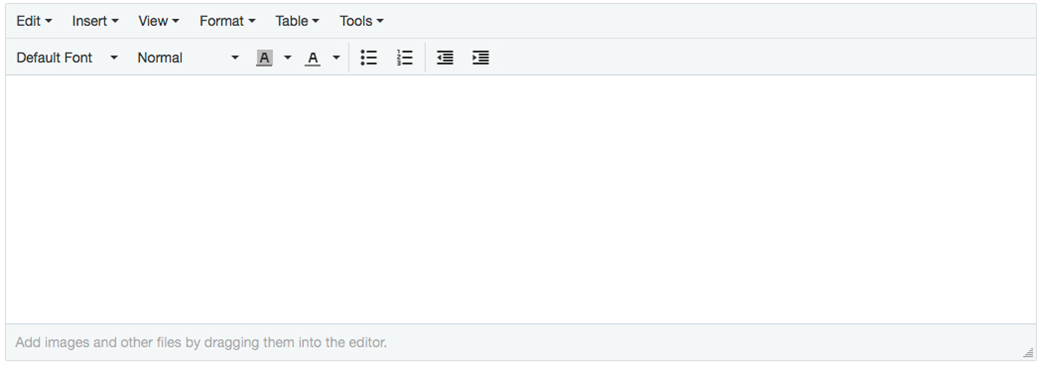
The content editor is the rich text editor used through Telligent Community that enables formatted text to be authored. It is shown wherever rich content can be defined:

Basic Editing
The editor's menu provides access to common editing functionality such as search and replace, insertion of rich elements, formatting options (such as bold, italic, code, headings, etc), color selection, font selection, text indentation, table definition, content previewing, and HTML source editing.
These features work like modern word processors to manipulate text in a "what you see is what you get" way.
Inserting Files
Files, such as images, videos, audio, and documents, can be included in content. Files can be inserted via the Insert > Insert image/video/file menu option, by dragging the file onto the editor, or by copying the file and pasting it into the editor. Note that copy/paste is subject to the browser's default interpretation of the content being copied and may not work for all file types. Inserted files will be previewed based on the enabled file viewers in Administration > File Viewers.
Once placed, files will render a preview that can be resized to meet the rendering needs of the content. If a file should be rendered as text (to just enable downloading), select the file and select Convert to link from the contextual toolbar:

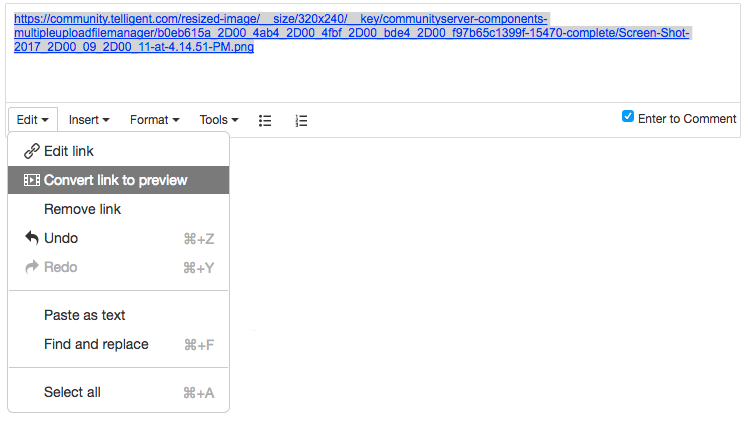
Linking to URLs
URLs to external websites and pages can be added to content by typing the URL as text (the editor will automatically change URLs to links for most URL types), by using the Insert > Link menu option, or by referencing a URL in the Insert > Insert image/video/file menu option.
To convert a link to a preview, select the link and choose Edit > Convert link to preview:
Insert an Emoticon or Emoji
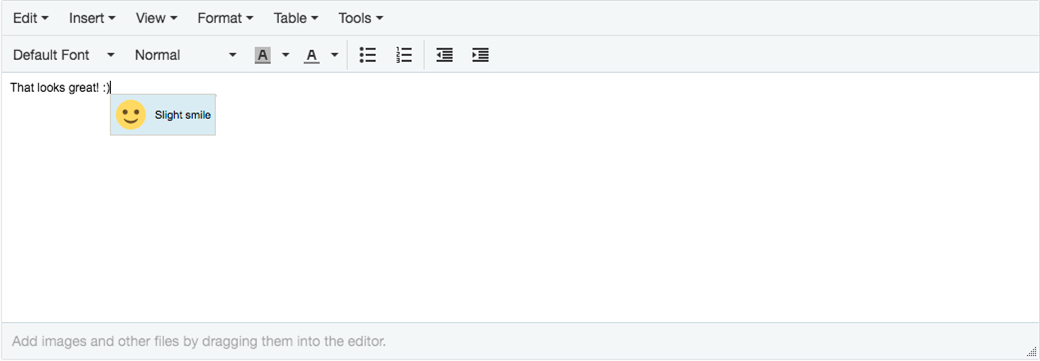
Emoji can be entered using your computer or device's emoji keyboard, by searching by typing the : prefix, or via the Insert > Emoticon option. Enabled emoji (based on configuration in Administration > Site > Emoticons) will be converted to the site-defined image representing that emoji.
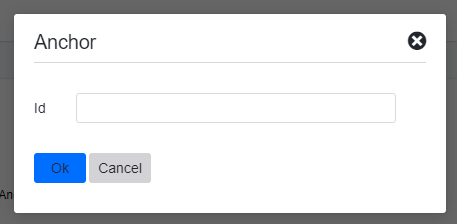
Insert an Anchor
With an anchor, you can link to certain location on the page.
- Open the page or post in the editing mode.
- Place the cursor where you want to insert the anchor.
- Click Insert > Anchor on the enhanced text editor menu bar. The Anchor dialog box appears.
- Enter a name for the anchor into the Name field It should not contain spaces.
- Click Ok. An anchor symbol appears where you have inserted the anchor.
Link to an Anchor
Linking to an anchor directs the viewer directly to a location on the current page or on another web page.
- Open the page or post in the editing mode and highlight the text you want to link to the anchor.
- Click Insert > Insert link on the enhanced text editor menu bar. The insert link dialog box appears.
- If you are linking to another web page, enter the URL of that page with the syntax #<anchor name> in the link URL. You can get the link to that full page by clicking the anchor and viewing the entire link in the browser address field.
- If you are linking to an anchor on the current page, click the Anchors drop-down list. A list of currently created anchors is displayed.
- Select the anchor you want to link the text to from this list.
- Click Ok. The text appears linked.
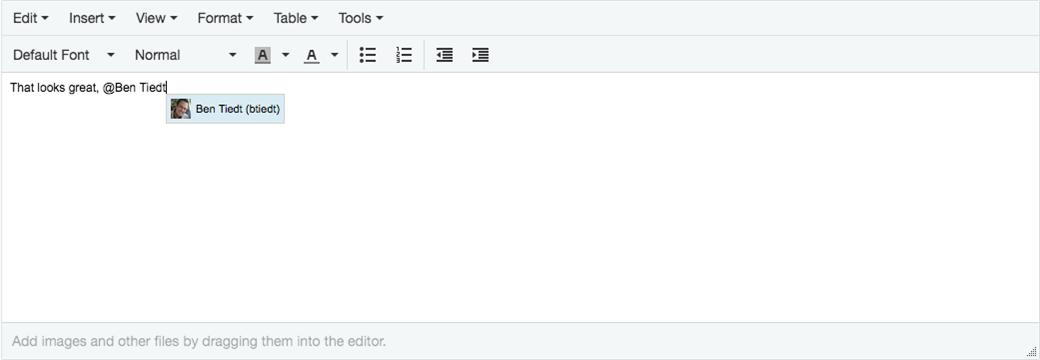
Insert a Mention
A mention can be added by typing @ and then text to search for a member or a group. Matching results will be listed and can be selected using the touch, mouse, or arrow keys. When saved, the mention will change to a link to that member or group. The member or group mentioned will also potentially get a notification that they were mentioned in the content to prompt their review.
Insert a Hashtag
A hashtag can be added by typing # and then text to search for an existing hashtag (or to define a new one). Matching results will be listed and can be selected using touch, mouse, or arrow keys. When saved, the hashtag becomes a link to find related content using the same tag/hashtag.

Insert a poll, embed code, source code, or other rich embeddable
Telligent Community supports extensions to the editor to enable embedding rich media. These extensions are enabled and configured within Administration > Extensions and include polls, embed codes (such as Twitter, Youtube, Facebook posts, etc), and syntax highlighted code embedding. For more details about individual extensions, search the documentation for specific functionality. Enabled extensions will be listed in the Insert menu of the editor.
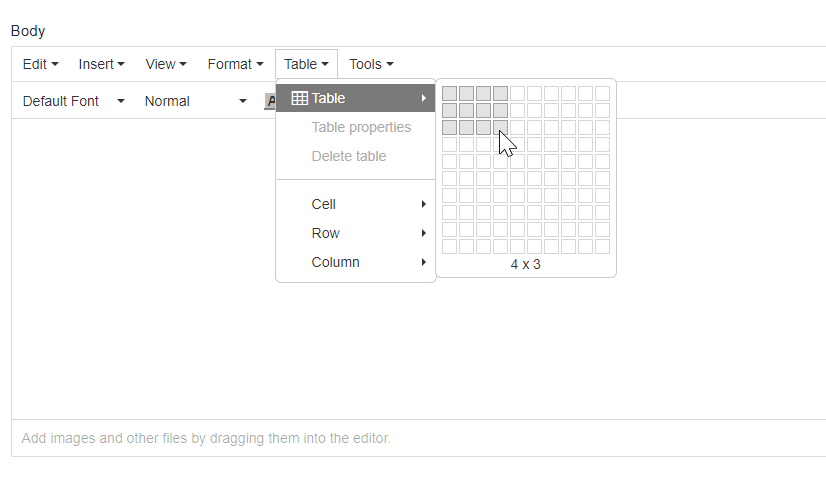
Working with Tables
To create a table in the rich text editor, click the Table toolbar item. A context menu will show an option to add a table. Hover over the Table item and select the dimensions of the table using the provided grid.
After the Table has been added to your page, you can resize it by dragging one of the corners.
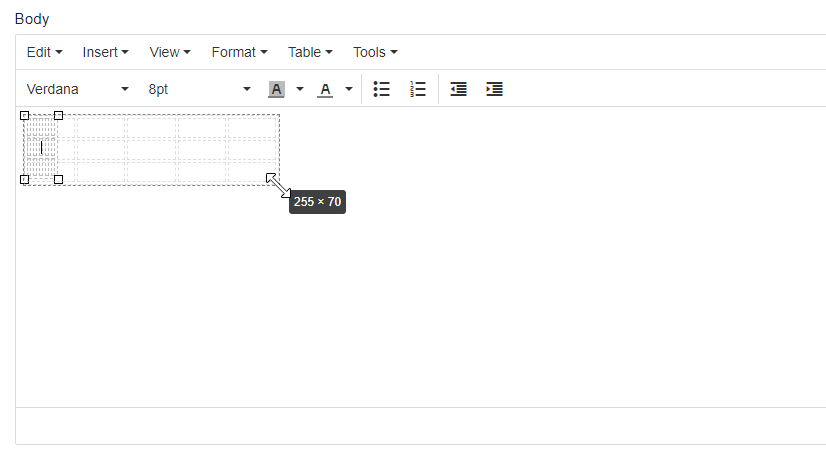
Once you have added your table you can populate your content or you can further configure the table.
General Configuration Options
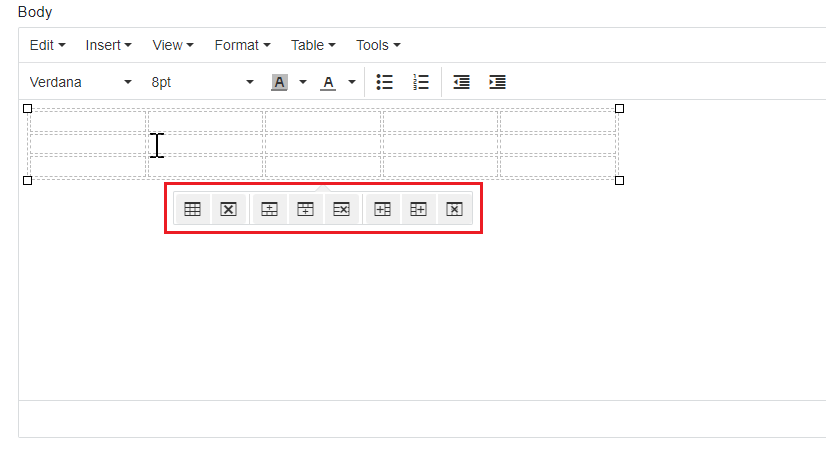
There are a few different ways that you can configure the table.
1) If you click your mouse anywhere within the table a small context menu of option icons will show below the table. Hover over each icon to see the function offered.
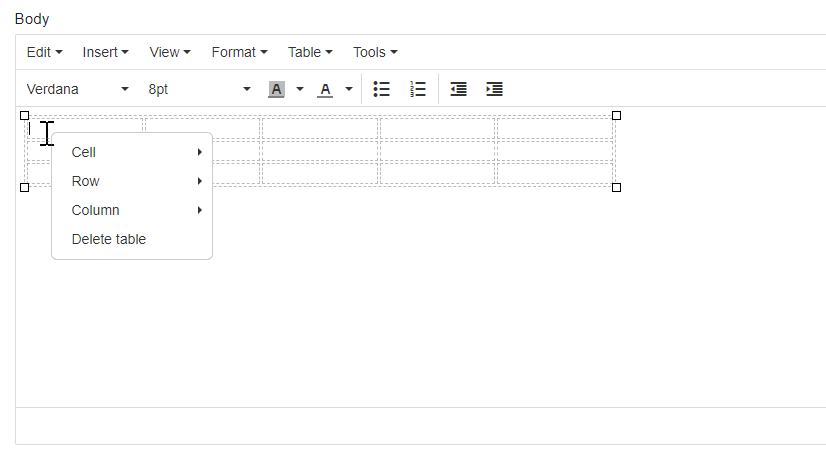
2) If you right click your mouse in any cell a context menu widow shows different table configuration options.
3) Clicking the Table toolbar item provides a number of different configuration options for the table. These are similar to what’s available in the context menus described above.
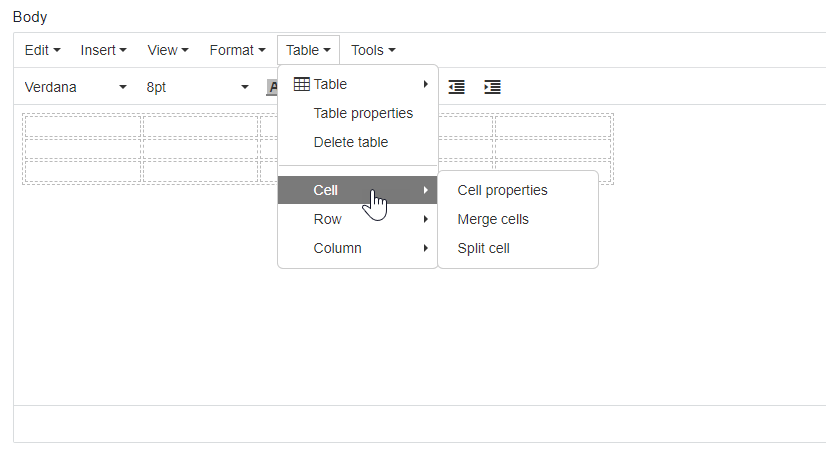
Table Properties
To configure the table as a whole first click within the table. Then click the Table toolbar item and click Table properties.
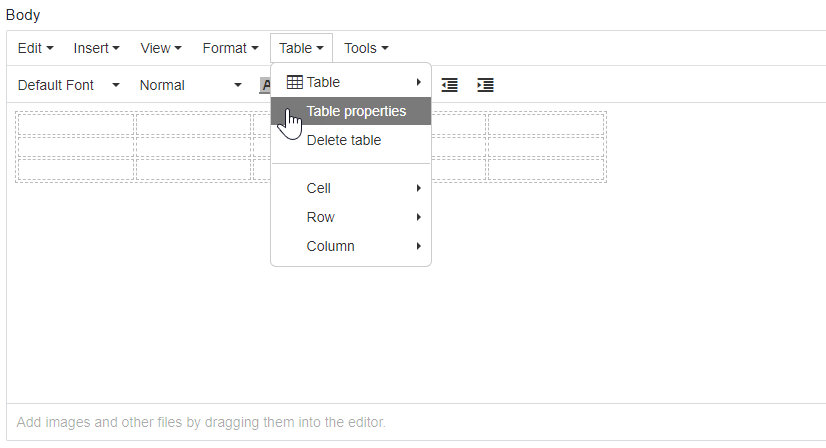
This will bring up the Table properties window. Here you can set different properties for the table.
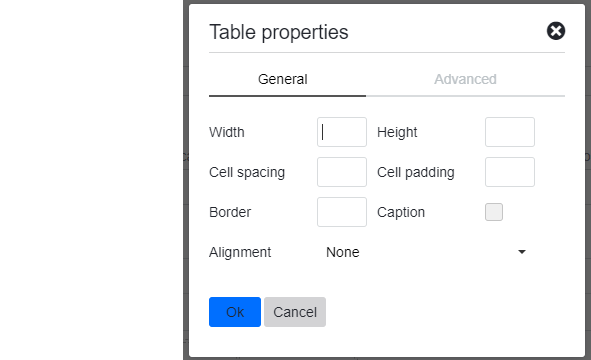
Width
Specify the width of the table.
Height
Specify the height of the table. Generally it’s best to leave this empty and let the content dictate the height.
Cell spacing
Specify the value for the cellspacing table tag attribute.
Cell padding
Specify the value for the cellpadding table tag attribute.
Border
Specify the table border width.
Alignment
Specify whether to align the table left, right, center or not aligned (default).
Advanced Tab
Under the Advanced tab you can specify custom styles for the table tag as well as the border and background styles.
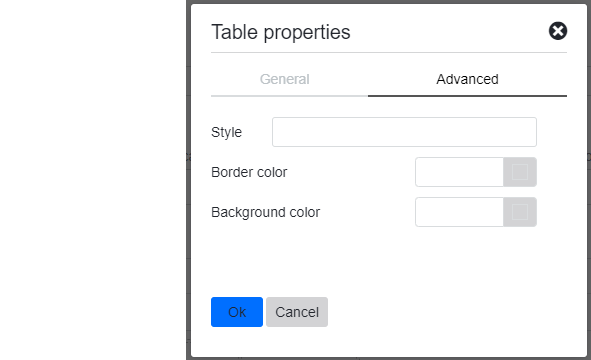
Note that best practice is to configure styles for your tables within the stylesheets for your website instead of configuring them for a single table.
Style
The Style field will show any styles set by other table property fields. You can also enter your own custom CSS styles.
Border color
You can define a specific hex color to use for the table border. Or you can click the gray box next to the field to pick a color.
Background color
You can define a specific hex color to use for the table background. Or you can click the gray box next to the field to pick a color.
Delete Table
To delete your table first click anywhere inside the table and then press the Delete table button in the Table dropdown menu.

Cells
Right click within the cell that you want to edit, or highlight a group of more than one cell, and right click. A context menu widow will offer different cell options.
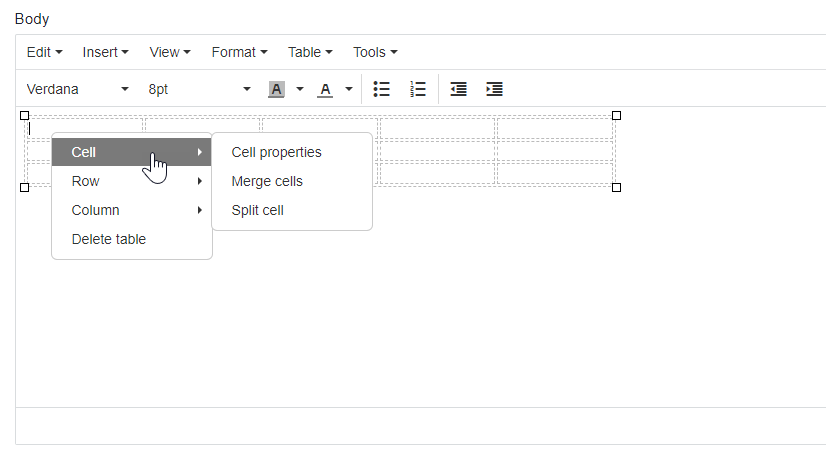
Cell Properties
This button will open a pop up menu that allows you to edit various properties of your table’s cells.
See the Table Cell Properties section below for more information.
Merge Cells
To merge cells, highlight the cells you wish to merge. Right click and hover over the Cells item and click Merge cells.
Split Cell
To split a cell select the cell you wish to split. Right click and hover over the Cells item then click on Split cell.
Table Cell Properties
To set the properties of a cell first click anywhere within that cell. Then click the Table toolbar button, hover over the Cell item and then click on Cell properties.
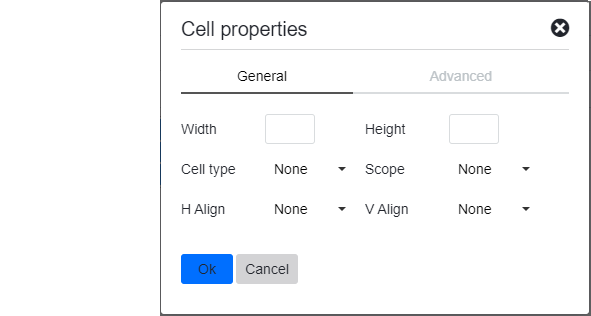
You can apply the same properties to multiple table cells by highlighting multiple table cells first instead of simply clicking within one.
This will bring up the Cell Properties window. Here you can set different properties for the table cells and the data within.
Width
Specify the width of the table cell.
Height
Specify the height of the table cell. Generally it’s best to leave this empty and let the content dictate the height.
Cell type
Set the element to be a regular table cell or a heading cell (<td> or <th>).
Horizontal Align
The H Align field lets you specify the horizontal alignment of the content within the cell.
Vertical Align
The V Align field lets you specify the vertical alignment of the content within the cell.
Advanced Tab
Under the Advanced tab you can specify custom styles for the table cell tag as well as the border and background styles.
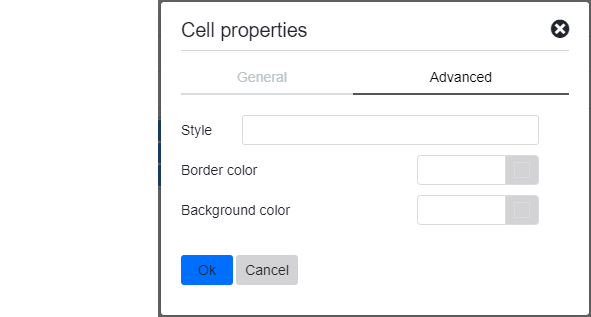
Note that best practice is to configure styles for your table cells within the stylesheets for your website instead of configuring them for a single table cell.
Style
Shows any styles set by other table cell property fields. You can also enter your own custom CSS styles.
Border color
Define a specific hex color to use for the table cell border. Or you can click the gray box next to the field to pick a color.
Background color
Define a specific hex color to use for the table cell background. Or you can click the gray box next to the field to pick a color.
Rows
To work with rows right click and highlight the Row button.
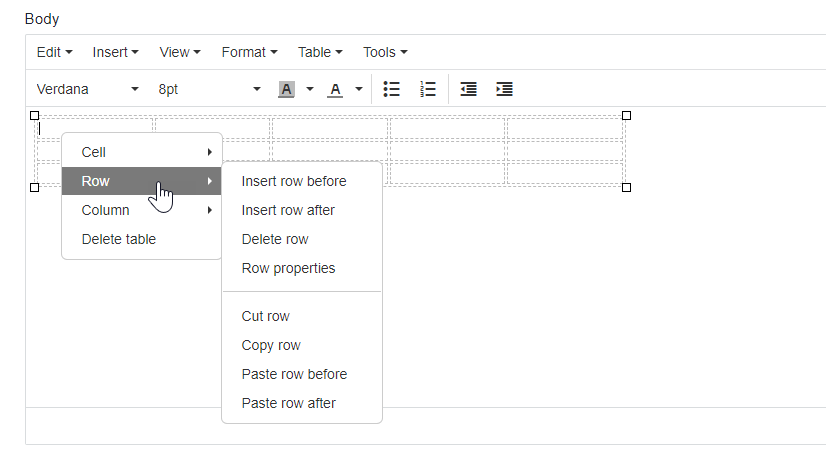
Insert Row Before
To insert a row before a row select the row you want added to, right click and press the Insert row before button.
Insert Row After
To insert a row after a row select the row you want added to, right click and press the Insert row after button.
Delete Row
To delete a row select the row you want deleted, right click and press the Delete row button.
Row Properties
To edit the row properties select the row you want edited (or click anywhere within a cell in that row) right click and select the Row properties button
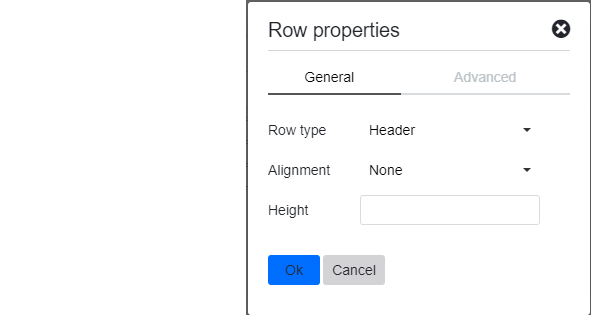
Row type
Sets whether the row is part of the table body, is a table header row or is a table footer row.
Alignment
Sets the alignment of the content within the row.
Height
Let’s you specify a specific pixel height of the row. It’s recommended to leave this field blank unless you have a good reason to specify a row height.
Advanced Tab
Under the Advanced tab you can specify custom styles for the table row tag as well as the border and background styles.
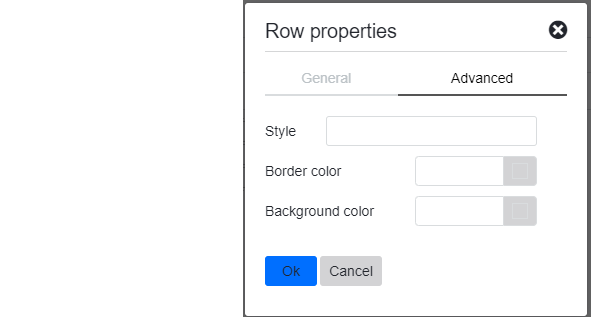
Note that best practice is to configure styles for your table rows within the stylesheets for your website instead of configuring them for a single table row.
Style
The Style field will show any styles set by other table row property fields. You can also enter your own custom CSS styles.
Border color
You can specify a specific hex color to use for the table row border. Or you can click the gray box next to the field to pick a color.
Background color
You can specify a specific hex color to use for the table row background. Or you can click the gray box next to the field to pick a color.
Cut Row
To cut a row select the row you want to cut, right click and press the Cut row button. You can then paste the row somewhere else in the table.
Copy Row
To copy a row select the row you want copied, right click and press the Copy row button. You can then paste the row somewhere else in the table.
Paste Row Before
To paste a row before another select the row you want to past before, right click and press the Paste row before button. You must copy or cut the row first.
Paste Row After
To paste a row after another select the row you want to insert after, right click and press the Paste row after button. You must copy or cut a row first.
Columns
To open the column options, right click and highlight Column.
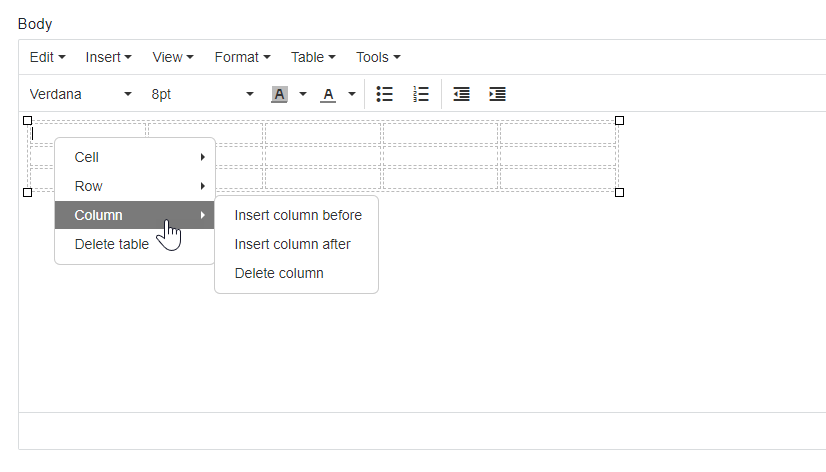
Insert Column Before
To insert a column before another column select the column that you want to insert before, right click and press the Insert column before button
Insert Column After
To insert a column after another column select the column that you want to insert after, right click and press the Insert column after button.
Delete Column
To delete a column select the column you want deleted, right click and press the Delete column button.
Edit in Fullscreen Mode
To edit content in a larger editor (that fills the browser window), select View > Fullscreen. To exist fullscreen mode, select View > Fullscreen again.