
All REST requests must be authorized to access the REST API. When accessing the REST API from javascript in a widget through the $.telligent.evolution REST methods, no additional headers must be specified. For all other scenarios, REST headers must be specified for the request to be processed. To prevent tokens and id's from being intercepted, it is recommended to always use HTTPS to authenticate with your Verint Community website.
Using the built in OAuth service
Verint Community has a built in OAuth service that can be configured to handle logging into Verint Community from your application. The built in OAuth service is based on the OAuth 2.0 specification. It allows your users to access their Verint Community content without giving up their passwords. Authenticating using OAuth is the recommendend way to authenticate against Verint Community when integrating Verint Community against your application.
The Verint Community OAuth Service provider utilizes four grant types, all of which can be used at the same time if the client type is configured as Confidential.
HTTPS/TLS
All OAuth requests, all API interactions in fact, should be done using HTTPS(Hypertext Transfer Protocol Secure), or more specifically, HTTP over TLS(Transport Layer Security), especially when dealing with sensitive data like authentication and authorization information as OAuth does. HTTPS should always be used in a production system and every effort should be used to use HTTPS even in non-production and development scenarios. When you fail to use secured communications, your communications become susceptible to common cyberattack vectors such as request sniffing, where a third party eavesdrops on your communication and steals information, or man-in-the-middle attacks where a third party not only listens but actively tampers with the data being sent. OAuth in general is sensitive to these scenarios because when the communication is not appropriately secured, user information and/or token information can be obtained to allow unauthorized access to your system.
Adding a new Client
Multiple clients can exist and be used at the same time for one or many external applications. To add a new client or manage existing clients go to Administration > Integration > OAuth Clients in Verint Community. When you have selected the appropriate values (which are described below) for you client application, click the "Save" button.
Name
The name field is required and used to identify the OAuth client.
Description
The description field is optional and is used to describe the OAuth client.
Main URL
The Main URL field is required and is the URL of the client application.
Callback URL/Redirect URLs
Note this label varies by version
The Callback URL field is required and is the URL to be redirected to after a client is authorized. It should be set to the HTTP endpoint in the external application that handles OAuth responses. In later versions of 12.0, multiple redirect URLs are supported by adding one per line in the field.
Client Type
The Client Type field is required with a default value of Confidential. Public should only be selected when clients are incapable of maintaining the confidentiality of their credentials (e.g. clients executing on the device used by the resource owner such as an installed native application or a browser-based application), and incapable of secure client authentication via any other means.
| Client Type | Description |
| Public | When clients are incapable of maintaining the confidentiality of their credentials (e.g. clients executing on the device used by the resource owner such as an installed native application or a browser-based application), and incapable of secure client authentication via any other means. |
| Confidential | When clients capable of maintaining the confidentiality of their credentials (e.g. client implemented on a secure server with restricted access to the client credentials), or capable of secure client authentication using other means. |
Confidential Clients and Client Secret Keys
The client secret key for a confidential client is as valuable as a password and should be kept secured at all times. It should never be embedded in a distributable application, mobile application or used in JavaScript.
As of 12.0.2.17496, you only have access to the client secret key in two scenarios, when the client is initially created and when the key is regenerated. It is important to immediately record the secret key as you will not be able to view it again. If you lose this key, it must be regenerated and any integrations using it updated.
Grant Types
There are four grant types which define the way client applications can get an access token. An access token is a random string provided by the Verint Community upon granting the client application access. The client application uses the access token on each request made to Verint Community. An access token is user specific and used to identify a user in order to apply the appropriate security context to the request.
| Grant Type | Description |
| Implicit |
Can be used with either "Confidential" or "Public" Client Types. To implement the Implicit grant type the client applications authenticates the user and sends the user to the Verint Community site. The user then confirms that they want to allow the client application to act on their behalf. The user is then redirected to the clients defined redirect URL with an access_token and expires_in appended to the querystring. This grant type is best suited to external applications that are already leveraging an single-sign-on integration with Verint Community. OBSOLETE in 12.1: Use Public authorization code flow with PKCE instead. |
| Authorization Code |
Can only be used with "Confidential" Client Types. To implement the Authorization Code grant type, the user authenticates with the client application then sends to user to the Verint Community site so the user can confirm they want to allow the client application to act on their behalf. Once the confirmation is made the user is redirected to the defined redirect url with a code value appended to the querystring. The code that is provided is called the authorization code. The authorization code is random string the client application uses to post back to the Verint Community site. The response will contain the access_token, expires_in and refresh_token or an error. An OAuth Client using the Authorization Code grant type can be configured as trusted. When a client is trusted, users will not be show the authorization form when authorization codes are requested. Only external applications managed by the owner of the community should be fully trusted, for example, content management systems extending the community and the mobile version of the community. This grant type is suitable for applications leveraging Verint Community for authentication or where the external application manages a separate set of authentication details or for long term opt-in integrations where end-user will also often access Verint Community's UI. |
| User Credentials |
Can be used with either "Confidential" or "Public" Client Types. The client application passes the users credentials to the Verint Community site. The response contains values for the access_token, expires_in and refresh_token or errors. This grant type is suitable for applications leveraging Verint Community for authentication and where exposure to the Verint Community site must be prevented. |
| Client Credentials |
Can only be used with "Confidential" Client Types. The user provides the client application with their Verint Community username. The client application then posts to the Verint Community site. The response will then contain an access_token, expires_in and refresh_token or an error. This grant type is best suited for trusted utilities. |
Authenticating Confidential Clients
(12.0.2.17496 and Higher Only). Confidential clients must authenticate every token request using a client Id and client secret as part of the request. These values should be sent in the Authentication header by url encoding the client id and url encoding the secret, concatenating them with a colon(:), Base64 encoding the combined string and apply a 'Basic' scheme as follows:
Authorization: Basic Base64Encde(urlEncode(clientId):urlEncode(secret))
So given a client Id of 16ca7439-4872-40d6-b2f8-f69f063a2a0b and a secret of cmcs_123_abcdefghijklmnopqrstuvwxyz, first make sure each value is URL encoded individually, then combine them to:
16ca7439-4872-40d6-b2f8-f69f063a2a0b:cmtk_123_abcdefghijklmnopqrstuvwxyz
Then Base64 encode that string to get:
MTZjYTc0MzktNDg3Mi00MGQ2LWIyZjgtZjY5ZjA2M2EyYTBiOmNtdGtfMTIzX2FiY2RlZmdoaWprbG1ub3BxcnN0dXZ3eHl6
Then add to the authorization header:
Authorization: Basic MTZjYTc0MzktNDg3Mi00MGQ2LWIyZjgtZjY5ZjA2M2EyYTBiOmNtdGtfMTIzX2FiY2RlZmdoaWprbG1ub3BxcnN0dXZ3eHl6
If you are running a version prior to 12.0.2.17496, or are incapable of modifying the Authorization header, you can still pass the client id and secret as part of the body of the token request by adding the client_id and secret parameters, though the latter method is preferred as it is more secure due to the fact it is in the HTTP headers and obfuscated. The values still need to be URL encoded when sent as part of the request body. You cannot use both methods simultaneously.
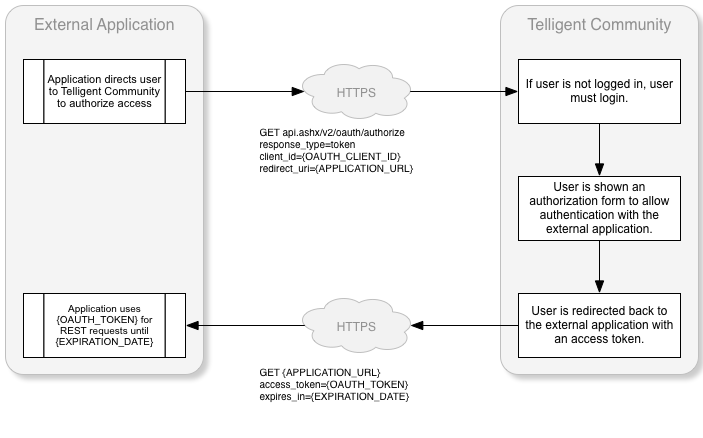
Using the Implicit Grant Type
When using the implicit grant type the client application will need to make a request to your Verint Community site: api.ashx/v2/oauth/authorize with the parameters below.
SECURITY NOTE
The implicit grant type is mostly suited for clients that cannot guarantee the security of storing the client credentials, such as a single-page JavaScript application or mobile app where the credentials would need to be distributed to a device. If it is possible to store the client credentials securely, then a confidential grant such as authorization code is more appropriate. The nature of of how a token is presented to the client(in the query string via an HTTP GET) makes it the least secure of the OAuth 2.0 grants since even when using HTTPS/TLS the return token is visible and not encrypted.
| Parameter | Description |
| response_type | make the value token. |
| client_id | Your Client ID. You can get this by going to your Verint Community site > Administration > Integration > OAuth Clients and clicking the Client Credentials button next to the client you added. |
| redirect_uri | The URI that the user should be redirected to after they authorize (or choose not to authorize) your application. This should match the URI used when setting up your OAuth Client in Verint Community. |
The workflow of an implicit grant request is:
Here is a sample implementation of a request to get an access token using the implicit grant type:
string clientId = "d39ccf7e-e64a-4c92-9584-a036aa1cb7be";
string redirectUri = "http://mysite.com/HandleImplicit.ashx";

Response.Redirect(string.Format("https://mytelligentcommunitysite.com/api.ashx/v2/oauth/authorize?response_type=token&client_id={0}&redirect_uri={1}", clientId, redirectUri));
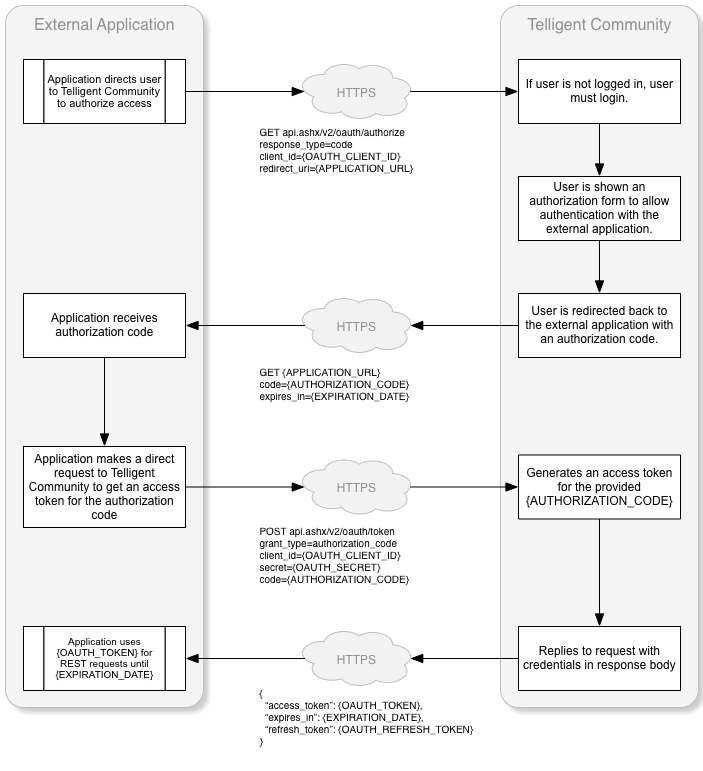
Using the Authorization Code Grant Type
When using the authorization code grant type the client application first requests an authorization code by making a request to your Verint Community site: api.ashx/v2/oauth/authorize with the parameters below.
Security Note
The authorization code grant is probably the most common and most secure grant and should be favored if the situation allows. It relies on a two step process to gain an access token as opposed to other grants which utilize a single request. Using this grant, the client does not identify the user or handle the user's credentials and delegates all of that to the authorization server. You still however must use HTTPS/TLS to ensure tokens can not be intercepted.
| Parameter | Description |
| response_type | make the value code. |
| client_id | Your Client ID. You can get this by going to your Verint Community site > Administration > Integration > OAuth Clients and clicking the Client Credentials button next to the client you added. |
| redirect_uri | The URI that the user should be redirected to after they authorize (or choose not to authorize) your application. This should match the URI used when setting up your OAuth Client in Verint Community. |
| scope | A space-separated, url-encoded list of scopes to grant the token. When not specified the scopes from the governing client are used. |
Once the authorization code has been received the client application will then need to make another request to your Verint Community site: api.ashx/v2/oauth/token with the following parameters:
| Parameter | Description |
| grant_type | make the value authorization_code. |
| client_id | ONLY USE WHEN THE CLIENT CANNOT AUTHENTICATE USING THE AUTHENTICATION HEADER. Your Client ID. You can get this by going to your Verint Community site > Administration > Integration > OAuth Clients and clicking the Client Credentials button next to the client you added. |
| client_secret | ONLY USE WHEN THE CLIENT CANNOT AUTHENTICATE USING THE AUTHENTICATION HEADER. Your Secret. You can get this by going to your Verint Community site > Administration > Integration > OAuth Clients and clicking the Client Credentials button next to the client you added. |
| code | The access code you received from your redirect URI. |
| redirect_uri | The redirect uri used in the original authorization code request. It must match exactly. |
| scope | A space-separated, url-encoded list of scopes to grant the token. When not specified the scopes from the authorization code are used. (12.1 +) |
The workflow of an authorization code request from a trusted client is:

If the client is untrusted, the user must authorize the authentication request as shown in this modified workflow:
Here is a sample implementation of a request for an authorization code:
var clientId = "d39ccf7e-e64a-4c92-9584-a036aa1cb7be";
var redirectUri = "http://mysite.com/HandleAuthCode.ashx";

Response.Redirect(string.Format("https://mytelligentcommunitysite.com/api.ashx/v2/oauth/authorize?response_type=code&client_id={0}&redirect_uri={1}&scope={2}", clientId, redirectUri,Uri.EscapeDataString("blogs.posts.readonly users.user.readonly")));
Verint Community will direct the user to the external application's redirect URL. Here is a sample handler for this request that includes the retrieval of the access token using the received authorization code:
var clientId = "d39ccf7e-e64a-4c92-9584-a036aa1cb7be";
var clientSecret = "eb5a50444ae8434bb40f1a7aad44481b0b7a17405286493888b813b7b0c26833";
var redirectUri = "http://mysite.com/HandleAuthCode.ashx";

var authCode = context.Request.QueryString["code"];
var authCodeExpiresUtc = context.Request.QueryString["expires_in"];

var tokenRequest = WebRequest.Create("https://mytelligentcommunitysite.com/api.ashx/v2/oauth/token") as HttpWebRequest;

var data = string.Format("client_id={0}&client_secret={1}&grant_type=authorization_code&code={2}&redirect_uri={3}", clientId, clientSecret, authCode, redirectUri);
byte[] bytes = Encoding.UTF8.GetBytes(data);

tokenRequest.ContentType = "application/x-www-form-urlencoded";
tokenRequest.ContentLength = bytes.Length;
tokenRequest.Method = "Post";

var requestStream = tokenRequest.GetRequestStream();
requestStream.Write(bytes, 0, bytes.Length);
requestStream.Close();

string tokenResponse = null;
using (var webTokenResponse = tokenRequest.GetResponse() as HttpWebResponse)
{
    using (var reader = new StreamReader(webTokenResponse.GetResponseStream()))
    {
        tokenResponse = reader.ReadToEnd();
    }
}

var serializer = new System.Web.Script.Serialization.JavaScriptSerializer();
var response = serializer.Deserialize<OAuthResponse>(tokenResponse);

var oauthToken = response.access_token;
var refreshToken = response.refresh_token;
var tokenExpiresUtc = DateTime.UtcNow.AddSeconds(response.expires_in);
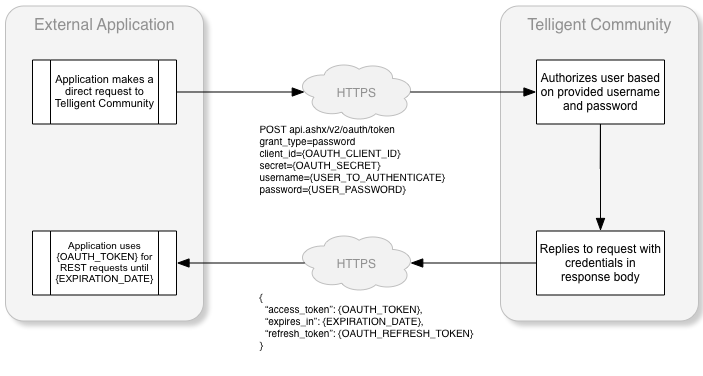
Using the User Credentials Grant Type
When using the User Credentials grant type the client application will need to make a request to your Verint Community site api.ashx/v2/oauth/token with the parameters below.
Security Note
One of the benefits of OAuth is that the client does not have manage the user's credentials as it delegates authentication to the identity provider. The User Credentials or Password grant type is a contrast to that concept as it requires that a user's credentials be passed to the identity provider to obtain a token, meaning the client has to at minimum collect them, and in turn pass them over a local or wide area network. This makes these credentials susceptible to HTTP request sniffing, especially when not sent over TLS/HTTPS.
| Parameter | Description |
| grant_type | make the value password. |
| client_id | ONLY USE WHEN THE CLIENT CANNOT AUTHENTICATE USING THE AUTHENTICATION HEADER. OR THE CLIENT IS PUBLIC. Your Client ID. You can get this by going to your Verint Community site > Administration > Integration > OAuth Clients and clicking the Client Credentials button next to the client you added. |
| username | The username of the user requesting access. |
| password | The password of the user requesting access. |
| secret | ONLY USE WHEN THE CLIENT CANNOT AUTHENTICATE USING THE AUTHENTICATION HEADER AND THE CLIENT IS CONFIDENTIAL. The client secret value if the client is confidential. |
| scope | A space-separated, url-encoded list of scopes to grant the token. When not specified the scopes from the governing client are used. (12.1 +) |
The workflow of a user credentials request:
Here's a sample implementation of a request to retrieve an access token using the user credentials grant type:
var clientId = "d39ccf7e-e64a-4c92-9584-a036aa1cb7be";
var username = "RandomUser";
var password = "password";

var tokenRequest = WebRequest.Create("https://mytelligentcommunitysite.com/api.ashx/v2/oauth/token") as HttpWebRequest;

var data = string.Format("client_id={0}&grant_type=password&username={1}&password={2}&scope={3}", clientId, username, password,Uri.EscapeDataString("blogs.posts.readonly users.user.readonly"));
byte[] bytes = Encoding.UTF8.GetBytes(data);

tokenRequest.ContentType = "application/x-www-form-urlencoded";
tokenRequest.ContentLength = bytes.Length;
tokenRequest.Method = "Post";

var requestStream = tokenRequest.GetRequestStream();
requestStream.Write(bytes, 0, bytes.Length);
requestStream.Close();

string tokenResponse = null;
using (var webTokenResponse = tokenRequest.GetResponse() as HttpWebResponse)
{
    using (var reader = new StreamReader(webTokenResponse.GetResponseStream()))
    {
        tokenResponse = reader.ReadToEnd();
    }
}

var serializer = new System.Web.Script.Serialization.JavaScriptSerializer();
var response = serializer.Deserialize<OAuthResponse>(tokenResponse);

var oauthToken = response.access_token;
var refreshToken = response.refresh_token;
var tokenExpiresUtc = DateTime.UtcNow.AddSeconds(response.expires_in);
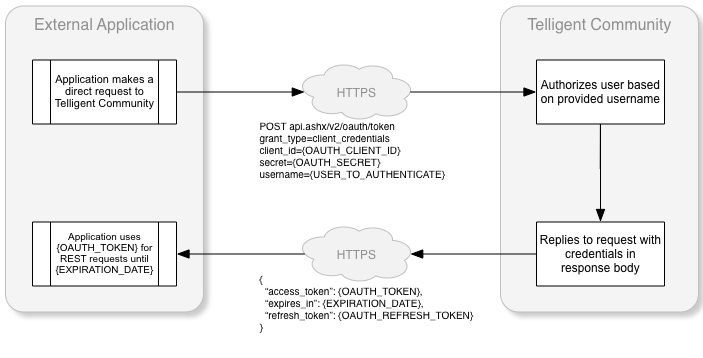
Using the Client Credentials Grant Type
When using the Client Credentials grant type the client application will need to make a request to your Verint Community site: api.ashx/v2/oauth/token with the parameters below.
Security Note
The Client Credentials grant type is most suited to utility type integrations versus full application integrations. When using this grant type you should be aware that a token can be issued for ANY valid user without any type of credential verification becasue only the username is presented. This means that if your client credentials are compromised any user can be impersonated in the client. It also means the request and response are susceptible to tampering when not used over TLS/HTTPS.
| Parameter | Description |
| grant_type | make the value client_credentials. |
| client_id | ONLY USE WHEN THE CLIENT CANNOT AUTHENTICATE USING THE AUTHENTICATION HEADER. . Your Client ID. You can get this by going to your Verint Community site > Administration > Integration > OAuth Clients and clicking the Client Credentials button next to the client you added. |
| client_secret | ONLY USE WHEN THE CLIENT CANNOT AUTHENTICATE USING THE AUTHENTICATION HEADER. . Your Secret. You can get this by going to your Verint Community site > Administration > Integration > OAuth Clients and clicking the Client Credentials button next to the client you added. |
| username | The username of the user requesting access. |
| scope | A space-separated, url-encoded list of scopes to grant the token. When not specified the scopes from the governing client are used. (12.1 +) |
The workflow of a client credentials request:
Here is a sample implementation of a request to get an access token using the client credentials grant type:
var clientId = "d39ccf7e-e64a-4c92-9584-a036aa1cb7be";
var clientSecret = "eb5a50444ae8434bb40f1a7aad44481b0b7a17405286493888b813b7b0c26833";

var tokenRequest = WebRequest.Create("https://mytelligentcommunitysite.com/api.ashx/v2/oauth/token") as HttpWebRequest;

var data = string.Format("client_id={0}&client_secret={1}&grant_type=client_credentials&username={2}&scope={3}", clientId, clientSecret, Username.Text,Uri.EscapeDataString("blogs.posts.readonly users.user.readonly"));
byte[] bytes = Encoding.UTF8.GetBytes(data);

tokenRequest.ContentType = "application/x-www-form-urlencoded";
tokenRequest.ContentLength = bytes.Length;
tokenRequest.Method = "Post";

var requestStream = tokenRequest.GetRequestStream();
requestStream.Write(bytes, 0, bytes.Length);
requestStream.Close();

string tokenResponse = null;
using (var webTokenResponse = tokenRequest.GetResponse() as HttpWebResponse)
{
    using (var reader = new StreamReader(webTokenResponse.GetResponseStream()))
    {
        tokenResponse = reader.ReadToEnd();
    }
}

var serializer = new System.Web.Script.Serialization.JavaScriptSerializer();
var response = serializer.Deserialize<OAuthResponse>(tokenResponse);

var oauthToken = response.access_token;
var refreshToken = response.refresh_token;
var tokenExpiresUtc = DateTime.UtcNow.AddSeconds(response.expires_in);
Refreshing Tokens
A refresh token can be used to obtain a new access token. The client application will need to make a request to your Verint Community site: api.ashx/v2/oauth/token with the following parameters. Note that refresh tokens are not supported or provided when using the implicit or client credentials grant types.
| Parameter | Description |
| grant_type | make the value refresh_token. |
| client_id | ONLY USE WHEN THE CLIENT CANNOT AUTHENTICATE USING THE AUTHENTICATION HEADER OR THE CLIENT IS PUBLIC. Your Client ID. You can get this by going to your Verint Community site > Administration > Integration > OAuth Clients and clicking the Client Credentials button next to the client you added. |
| client_secret | ONLY USE WHEN THE CLIENT CANNOT AUTHENTICATE USING THE AUTHENTICATION HEADER AND THE CLIENT IS CONFIDENTIAL. Your Secret. You can get this by going to your Verint Community site > Administration > Integration > OAuth Clients and clicking the Client Credentials button next to the client you added. |
| refresh_token | The refresh token you received when obtaining an access_token. |
Here is a sample implementation of a request to get an access token using the refresh token:
var clientId = "d39ccf7e-e64a-4c92-9584-a036aa1cb7be";
var clientSecret = "eb5a50444ae8434bb40f1a7aad44481b0b7a17405286493888b813b7b0c26833";
var refreshToken = "6767c696d6a84bdeb72470f7a73098445675019ff76d4adca0d76d0d852b1eab";

var tokenRequest = WebRequest.Create("https://mytelligentcommunitysite.com/api.ashx/v2/oauth/token") as HttpWebRequest;

var data = string.Format("client_id={0}&client_secret={1}&grant_type=refresh_token&refresh_token={2}", clientId, clientSecret, refreshToken);
byte[] bytes = Encoding.UTF8.GetBytes(data);

tokenRequest.ContentType = "application/x-www-form-urlencoded";
tokenRequest.ContentLength = bytes.Length;
tokenRequest.Method = "Post";

var requestStream = tokenRequest.GetRequestStream();
requestStream.Write(bytes, 0, bytes.Length);
requestStream.Close();

string tokenResponse = null;
using (var webTokenResponse = tokenRequest.GetResponse() as HttpWebResponse)
{
    using (var reader = new StreamReader(webTokenResponse.GetResponseStream()))
    {
        tokenResponse = reader.ReadToEnd();
    }
}

var serializer = new System.Web.Script.Serialization.JavaScriptSerializer();
var response = serializer.Deserialize<OAuthResponse>(tokenResponse);

var oauthToken = response.access_token;
refreshToken = response.refresh_token;
var tokenExpiresUtc = DateTime.UtcNow.AddSeconds(response.expires_in);
Using an access token to make a REST request
Once the access token is received, the client application can then use the access token to build the authorization header which is used to authorize REST requests. The following sample shows how to build the authorization header and make a REST request:
var oauthToken = response.access_token;
var refreshToken = response.refresh_token;
var tokenExpiresUtc = DateTime.UtcNow.AddSeconds(response.expires_in);

// Format of "OAuth {token}" or "Bearer {token}" is accepted
var oauthKey = String.Format("{0} {1}", "Bearer", oauthToken);

// Build the REST request
var restRequest = WebRequest.Create("https://mytelligentcommunitysite.com/api.ashx/v2/info.json") as HttpWebRequest;
restRequest.Method = "Get";
restRequest.Headers.Add("Authorization", oauthKey);

string restResponse = null;
using (var webRESTResponse = (HttpWebResponse)restRequest.GetResponse())
{
    var stream = webRESTResponse.GetResponseStream();
    if (stream != null)
    {
        using (var reader = new StreamReader(stream))
        {
            restResponse = reader.ReadToEnd();
        }
    }
}
Using an API Key and username to authenticate REST requests
Assign The API Key Permission
Beginning in 12.0, API key usage is limited to users with a specific permission. For users to use API keys, they must be in a site role that has the Rest API Key Access permission.

When using an API key and username to access a Verint Community site from your application, the application is responsible for storing the valid username and API key and passing that information along to the Verint Community site. When doing this each user accessing the REST API requires an API key. A service account van also be used to limit maintenance overhead for permissions. This requires the application to only need to store valid usernames and on the request, to authenticate using the service account API key and username. An impersonation header, which would contain the username of the user being impersonated, would then be added to the HTTP header.
Generate a platform API key
- While logged in, click on "Settings" at the top right to go to your settings page
- Click on the "Site Options" tab and scroll to the bottom
- Click on "Create and Edit Application Keys"
- Fill in a "name" for the key, such as "admin-key"
- Copy or take note of the generated key.
Authenticating using an API key
To authenticate using an API token the heading Rest-User-Token must be passed. The Rest-User-Token is a user token identifying the user accessing the REST API. It is a base64-encoded concatenation of the user's API key, a colon, and the user's username.
Here is a sample implementation of a REST API GET request using the Rest-User-Token:
var request = WebRequest.Create("https://mytelligentcommunitysite.com/api.ashx/v2/info.json") as HttpWebRequest;
request.Method = "Get";

// replace the "admin" and "Admin's API key" with your valid user and apikey!
var adminKey = String.Format("{0}:{1}", "Admin's API key", "admin");
var adminKeyBase64 = Convert.ToBase64String(Encoding.UTF8.GetBytes(adminKey));

request.Headers.Add("Rest-User-Token", adminKeyBase64);

var response = request.GetResponse() as HttpWebResponse;
Impersonating a user when authenticating using an API key
If the user defined by the Rest-User-Token header has the permission to impersonate other users, the Rest-Impersonate-User header can be set to the username of the user that should be impersonated. When impersonating, any action performed via the REST API is done on behalf of the impersonated user.
Here is a sample implementation of a REST API GET request using Rest-User-Token and Rest-Impersonate-User:
var request = WebRequest.Create("https://mytelligentcommunitysite.com/api.ashx/v2/info.json") as HttpWebRequest;
request.Method = "Get";

// replace the "admin" and "Admin's API key" with your valid user and apikey!
var adminKey = String.Format("{0}:{1}", "u9rsrtkgfmt9qtqgct2fi9acc8zl8g", "admin");
var adminKeyBase64 = Convert.ToBase64String(Encoding.UTF8.GetBytes(adminKey));


request.Headers.Add("Rest-User-Token", adminKeyBase64);

// Add the impersonation header.  Replace the "RandomUser" with the username of the user you are impersonating.
request.Headers.Add("Rest-Impersonate-User", "RandomUser");

var response = request.GetResponse() as HttpWebResponse;
API Keys and the Authentication Header
In versions of Community 12 released after September 2021, you can pass an API key as part of the Authorization header. This is particularly useful if the platform you are using is incapable not only of supporting OAuth, but it also cannot support custom headers. The format for the key itself does not change, however it is prefixed by Evolution-ApiKey, space, then the Base64 encoded key/username value described above. So the value of the Authorization header would be
Evolution-ApiKey base64EncodedString
This does not affect impersonation, which still requires a custom header. If you cannot add any custom headers, you will need to utilize API Keys with the appropriate permissions using this method.
Security Considerations for API Keys
API keys is by far the easiest solution to implement, but it is also the least secure. For one thing, API keys do not expire and rely on a user to delete the key before it becomes unusable. Furthermore when using an API on an account capable of impersonation, anyone with that key is capable of impersonating other users. Because the API key is sent as a header, it is susceptible to being intercepted if not used on a secure(HTTPS) connection.
While they are not deprecated or obsolete, API keys are considered a legacy feature and the recommendation is to not use them for production code. Generally it is recommended that API keys are used only in maintenance or utility applications when OAuth is not a reasonable option.
Api Key Visibility
As of 12.0.2.17496, you can only see an API key after its immediately created or regenerated so it is imperative you record it immediately as it will not be visible after this. If you lose this key, it must be regenerated and all usages updated.