All REST requests must be authorized to access the REST API. When accessing the REST API from javascript in a widget through the $.telligent.evolution REST methods, no additional headers must be specified. For all other scenarios, REST headers must be specified for the request to be processed. To prevent tokens and id's from being intercepted, it is recommended to always use HTTPS to authenticate with your Verint Community website.
Table of Contents
Using the built in OAuth service
Verint Community has a built in OAuth service that can be configured to handle logging into Verint Community from your application. The built in OAuth service is based on the OAuth 2.0 specification. It allows your users to access their Verint Community content without giving up their passwords. Authenticating using OAuth is the recommendend way to authenticate against Verint Community when integrating Verint Community against your application.
The Verint Community OAuth Service provider utilizes four grant types, all of which can be used at the same time if the client type is configured as Confidential.
Adding a new Client
Multiple clients can exist and be used at the same time for one or many external applications. To add a new client or manage existing clients go to Administration > Integration > OAuth Clients in Verint Community. When you have selected the appropriate values (which are described below) for you client application, click the "Save" button.
Name
The name field is required and used to identify the OAuth client.
Description
The description field is optional and is used to describe the OAuth client.
Main URL
The Main URL field is required and is the URL of the client application.
Callback URL
The Callback URL field is required and is the URL to be redirected to after a client is authorized. It should be set to the HTTP endpoint in the external application that handles OAuth responses.
Client Type
The Client Type field is required with a default value of Confidential. Public should only be selected when clients are incapable of maintaining the confidentiality of their credentials (e.g. clients executing on the device used by the resource owner such as an installed native application or a browser-based application), and incapable of secure client authentication via any other means.
| Client Type | Description |
| Public | When clients are incapable of maintaining the confidentiality of their credentials (e.g. clients executing on the device used by the resource owner such as an installed native application or a browser-based application), and incapable of secure client authentication via any other means. |
| Confidential | When clients capable of maintaining the confidentiality of their credentials (e.g. client implemented on a secure server with restricted access to the client credentials), or capable of secure client authentication using other means. |
Grant Types
There are four grant types which define the way client applications can get an access token. An access token is a random string provided by the Verint Community upon granting the client application access. The client application uses the access token on each request made to Verint Community. An access token is user specific and used to identify a user in order to apply the appropriate security context to the request.
| Grant Type | Description |
| Implicit |
Can be used with either "Confidential" or "Public" Client Types. To implement the Implicit grant type the client applications authenticates the user and sends the user to the Verint Community site. The user then confirms that they want to allow the client application to act on their behalf. The user is then redirected to the clients defined redirect URL with an access_token and expires_in appended to the querystring. This grant type is best suited to external applications that are already leveraging an single-sign-on integration with Verint Community. |
| Authorization Code |
Can only be used with "Confidential" Client Types. To implement the Authorization Code grant type, the user authenticates with the client application then sends to user to the Verint Community site so the user can confirm they want to allow the client application to act on their behalf. Once the confirmation is made the user is redirected to the defined redirect url with a code value appended to the querystring. The code that is provided is called the authorization code. The authorization code is random string the client application uses to post back to the Verint Community site. The response will contain the access_token, expires_in and refresh_token or an error. An OAuth Client using the Authorization Code grant type can be configured as trusted. When a client is trusted, users will not be show the authorization form when authorization codes are requested. Only external applications managed by the owner of the community should be fully trusted, for example, content management systems extending the community and the mobile version of the community. This grant type is suitable for applications leveraging Verint Community for authentication or where the external application manages a separate set of authentication details or for long term opt-in integrations where end-user will also often access Verint Community's UI. |
| User Credentials |
Can be used with either "Confidential" or "Public" Client Types. The client application passes the users credentials to the Verint Community site. The response contains values for the access_token, expires_in and refresh_token or errors. This grant type is suitable for applications leveraging Verint Community for authentication and where exposure to the Verint Community site must be prevented. |
| Client Credentials |
Can only be used with "Confidential" Client Types. The user provides the client application with their Verint Community username. The client application then posts to the Verint Community site. The response will then contain an access_token, expires_in and refresh_token or an error. This grant type is best suited for trusted utilities. |
Using the Implicit Grant Type
When using the implicit grant type the client application will need to make a request to your Verint Community site: api.ashx/v2/oauth/authorize with the following parameters:
| Parameter | Description |
| response_type | make the value token. |
| client_id | Your Client ID. You can get this by going to your Verint Community site > Administration > Integration > OAuth Clients and clicking the Client Credentials button next to the client you added. |
| redirect_uri | The URI that the user should be redirected to after they authorize (or choose not to authorize) your application. This should match the URI used when setting up your OAuth Client in Verint Community. |
The workflow of an implicit grant request is:
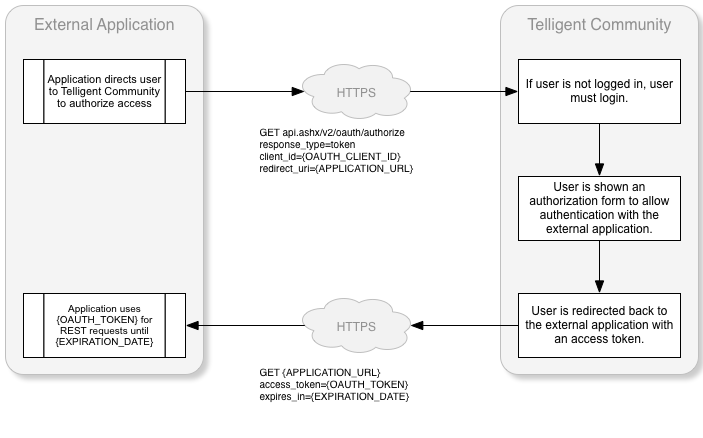
Here is a sample implementation of a request to get an access token using the implicit grant type:
string clientId = "d39ccf7e-e64a-4c92-9584-a036aa1cb7be";
string redirectUri = "http://mysite.com/HandleImplicit.ashx";

Response.Redirect(string.Format("https://mytelligentcommunitysite.com/api.ashx/v2/oauth/authorize?response_type=token&client_id={0}&redirect_uri={1}", clientId, redirectUri));
Using the Authorization Code Grant Type
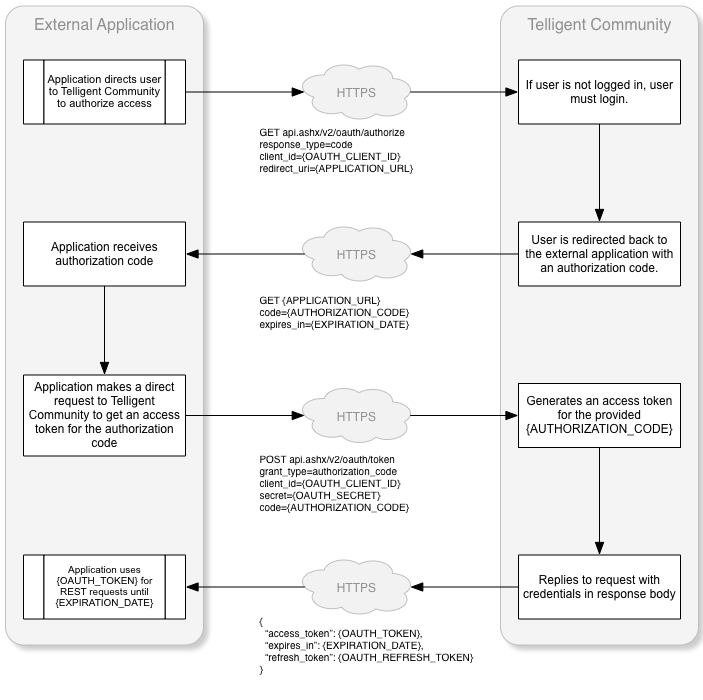
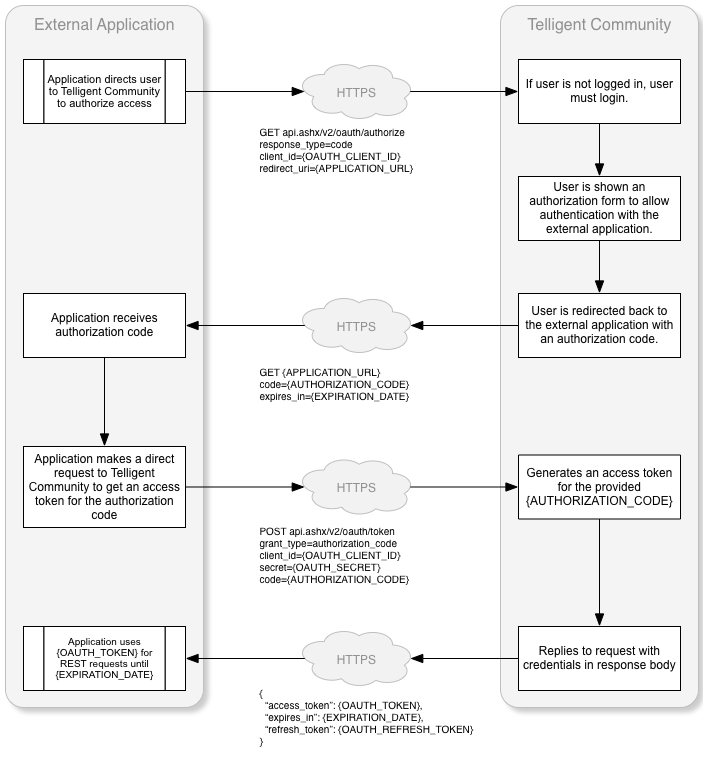
When using the authorization code grant type the client application first requests an authorization code by making a request to your Verint Community site: api.ashx/v2/oauth/authorize with the following parameters:
| Parameter | Description |
| response_type | make the value code. |
| client_id | Your Client ID. You can get this by going to your Verint Community site > Administration > Integration > OAuth Clients and clicking the Client Credentials button next to the client you added. |
| redirect_uri | The URI that the user should be redirected to after they authorize (or choose not to authorize) your application. This should match the URI used when setting up your OAuth Client in Verint Community. |
Once the authorization code has been received the client application will then need to make another request to your Verint Community site: api.ashx/v2/oauth/token with the following parameters:
| Parameter | Description |
| grant_type | make the value authorization_code. |
| client_id | Your Client ID. You can get this by going to your Verint Community site > Administration > Integration > OAuth Clients and clicking the Client Credentials button next to the client you added. |
| client_secret | Your Secret. You can get this by going to your Verint Community site > Administration > Integration > OAuth Clients and clicking the Client Credentials button next to the client you added. |
| code | The access code you received from your redirect URI. |
The workflow of an authorization code request from a trusted client is:
If the client is untrusted, the user must authorize the authentication request as shown in this modified workflow:
Here is a sample implementation of a request for an authorization code:
var clientId = "d39ccf7e-e64a-4c92-9584-a036aa1cb7be";
var redirectUri = "http://mysite.com/HandleAuthCode.ashx";

Response.Redirect(string.Format("https://mytelligentcommunitysite.com/api.ashx/v2/oauth/authorize?response_type=code&client_id={0}&redirect_uri={1}", clientId, redirectUri));
Verint Community will direct the user to the external application's redirect URL. Here is a sample handler for this request that includes the retrieval of the access token using the received authorization code:
var clientId = "d39ccf7e-e64a-4c92-9584-a036aa1cb7be";
var clientSecret = "eb5a50444ae8434bb40f1a7aad44481b0b7a17405286493888b813b7b0c26833";
var redirectUri = "http://mysite.com/HandleAuthCode.ashx";

var authCode = context.Request.QueryString["code"];
var authCodeExpiresUtc = context.Request.QueryString["expires_in"];

var tokenRequest = WebRequest.Create("https://mytelligentcommunitysite.com/api.ashx/v2/oauth/token") as HttpWebRequest;

var data = string.Format("client_id={0}&client_secret={1}&grant_type=authorization_code&code={2}&redirect_uri={3}", clientId, clientSecret, authCode, redirectUri);
byte[] bytes = Encoding.UTF8.GetBytes(data);

tokenRequest.ContentType = "application/x-www-form-urlencoded";
tokenRequest.ContentLength = bytes.Length;
tokenRequest.Method = "Post";

var requestStream = tokenRequest.GetRequestStream();
requestStream.Write(bytes, 0, bytes.Length);
requestStream.Close();

string tokenResponse = null;
using (var webTokenResponse = tokenRequest.GetResponse() as HttpWebResponse)
{
    using (var reader = new StreamReader(webTokenResponse.GetResponseStream()))
    {
        tokenResponse = reader.ReadToEnd();
    }
}

var serializer = new System.Web.Script.Serialization.JavaScriptSerializer();
var response = serializer.Deserialize<OAuthResponse>(tokenResponse);

var oauthToken = response.access_token;
var refreshToken = response.refresh_token;
var tokenExpiresUtc = DateTime.UtcNow.AddSeconds(response.expires_in);
Using the User Credentials Grant Type
When using the User Credentials grant type the client application will need to make a request to your Verint Community site api.ashx/v2/oauth/token with the following parameters:
| Parameter | Description |
| grant_type | make the value password. |
| client_id | Your Client ID. You can get this by going to your Verint Community site > Administration > Integration > OAuth Clients and clicking the Client Credentials button next to the client you added. |
| username | The username of the user requesting access. |
| password | The password of the user requesting access. |
The workflow of a user credentials request:
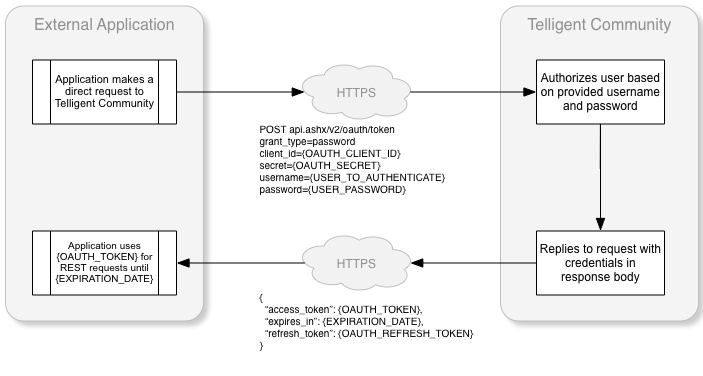
Heres a sample implementation of a request to retrieve an access token using the user credentials grant type:
var clientId = "d39ccf7e-e64a-4c92-9584-a036aa1cb7be";
var username = "RandomUser";
var password = "password";

var tokenRequest = WebRequest.Create("https://mytelligentcommunitysite.com/api.ashx/v2/oauth/token") as HttpWebRequest;

var data = string.Format("client_id={0}&grant_type=password&username={1}&password={2}", clientId, username, password);
byte[] bytes = Encoding.UTF8.GetBytes(data);

tokenRequest.ContentType = "application/x-www-form-urlencoded";
tokenRequest.ContentLength = bytes.Length;
tokenRequest.Method = "Post";

var requestStream = tokenRequest.GetRequestStream();
requestStream.Write(bytes, 0, bytes.Length);
requestStream.Close();

string tokenResponse = null;
using (var webTokenResponse = tokenRequest.GetResponse() as HttpWebResponse)
{
    using (var reader = new StreamReader(webTokenResponse.GetResponseStream()))
    {
        tokenResponse = reader.ReadToEnd();
    }
}

var serializer = new System.Web.Script.Serialization.JavaScriptSerializer();
var response = serializer.Deserialize<OAuthResponse>(tokenResponse);

var oauthToken = response.access_token;
var refreshToken = response.refresh_token;
var tokenExpiresUtc = DateTime.UtcNow.AddSeconds(response.expires_in);
Using the Client Credentials Grant Type
When using the Client Credentials grant type the client application will need to make a request to your Verint Community site: api.ashx/v2/oauth/token with the following parameters:
| Parameter | Description |
| grant_type | make the value client_credentials. |
| client_id | Your Client ID. You can get this by going to your Verint Community site > Administration > Integration > OAuth Clients and clicking the Client Credentials button next to the client you added. |
| client_secret | Your Secret. You can get this by going to your Verint Community site > Administration > Integration > OAuth Clients and clicking the Client Credentials button next to the client you added. |
| username | The username of the user requesting access. |
The workflow of a client credentials request:
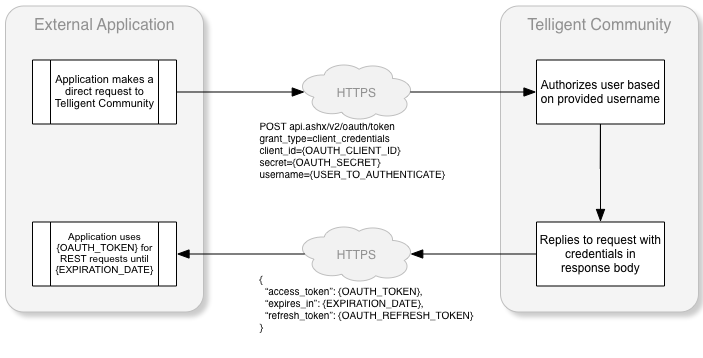
Here is a sample implementation of a request to get an access token using the client credentials grant type:
var clientId = "d39ccf7e-e64a-4c92-9584-a036aa1cb7be";
var clientSecret = "eb5a50444ae8434bb40f1a7aad44481b0b7a17405286493888b813b7b0c26833";

var tokenRequest = WebRequest.Create("https://mytelligentcommunitysite.com/api.ashx/v2/oauth/token") as HttpWebRequest;

var data = string.Format("client_id={0}&client_secret={1}&grant_type=client_credentials&username={2}", clientId, clientSecret, Username.Text);
byte[] bytes = Encoding.UTF8.GetBytes(data);

tokenRequest.ContentType = "application/x-www-form-urlencoded";
tokenRequest.ContentLength = bytes.Length;
tokenRequest.Method = "Post";

var requestStream = tokenRequest.GetRequestStream();
requestStream.Write(bytes, 0, bytes.Length);
requestStream.Close();

string tokenResponse = null;
using (var webTokenResponse = tokenRequest.GetResponse() as HttpWebResponse)
{
    using (var reader = new StreamReader(webTokenResponse.GetResponseStream()))
    {
        tokenResponse = reader.ReadToEnd();
    }
}

var serializer = new System.Web.Script.Serialization.JavaScriptSerializer();
var response = serializer.Deserialize<OAuthResponse>(tokenResponse);

var oauthToken = response.access_token;
var refreshToken = response.refresh_token;
var tokenExpiresUtc = DateTime.UtcNow.AddSeconds(response.expires_in);
Refreshing Tokens
A refresh token can be used to obtain a new access token. The client application will need to make a request to your Verint Community site: api.ashx/v2/oauth/token with the following parameters:
| Parameter | Description |
| grant_type | make the value refresh_token. |
| client_id | Your Client ID. You can get this by going to your Verint Community site > Administration > Integration > OAuth Clients and clicking the Client Credentials button next to the client you added. |
| client_secret | Your Secret. You can get this by going to your Verint Community site > Administration > Integration > OAuth Clients and clicking the Client Credentials button next to the client you added. |
| refresh_token | The refresh token you received when obtaining an access_token. |
Here is a sample implementation of a request to get an access token using the refresh token:
var clientId = "d39ccf7e-e64a-4c92-9584-a036aa1cb7be";
var clientSecret = "eb5a50444ae8434bb40f1a7aad44481b0b7a17405286493888b813b7b0c26833";
var refreshToken = "6767c696d6a84bdeb72470f7a73098445675019ff76d4adca0d76d0d852b1eab";

var tokenRequest = WebRequest.Create("https://mytelligentcommunitysite.com/api.ashx/v2/oauth/token") as HttpWebRequest;

var data = string.Format("client_id={0}&client_secret={1}&grant_type=refresh_token&refresh_token={2}", clientId, clientSecret, refreshToken);
byte[] bytes = Encoding.UTF8.GetBytes(data);

tokenRequest.ContentType = "application/x-www-form-urlencoded";
tokenRequest.ContentLength = bytes.Length;
tokenRequest.Method = "Post";

var requestStream = tokenRequest.GetRequestStream();
requestStream.Write(bytes, 0, bytes.Length);
requestStream.Close();

string tokenResponse = null;
using (var webTokenResponse = tokenRequest.GetResponse() as HttpWebResponse)
{
    using (var reader = new StreamReader(webTokenResponse.GetResponseStream()))
    {
        tokenResponse = reader.ReadToEnd();
    }
}

var serializer = new System.Web.Script.Serialization.JavaScriptSerializer();
var response = serializer.Deserialize<OAuthResponse>(tokenResponse);

var oauthToken = response.access_token;
refreshToken = response.refresh_token;
var tokenExpiresUtc = DateTime.UtcNow.AddSeconds(response.expires_in);
Using an access token to make a REST request
Once the access token is received, the client application can then use the access token to build the authorization header which is used to authorize REST requests. The following sample shows how to build the authorization header and make a REST request:
var oauthToken = response.access_token;
var refreshToken = response.refresh_token;
var tokenExpiresUtc = DateTime.UtcNow.AddSeconds(response.expires_in);

// Format of "OAuth {token}" or "Bearer {token}" is accepted
var oauthKey = String.Format("{0} {1}", "OAuth", oauthToken);

// Build the REST request
var restRequest = WebRequest.Create("https://mytelligentcommunitysite.com/api.ashx/v2/info.json") as HttpWebRequest;
restRequest.Method = "Get";
restRequest.Headers.Add("Authorization", oauthKey);

string restResponse = null;
using (var webRESTResponse = (HttpWebResponse)restRequest.GetResponse())
{
    var stream = webRESTResponse.GetResponseStream();
    if (stream != null)
    {
        using (var reader = new StreamReader(stream))
        {
            restResponse = reader.ReadToEnd();
        }
    }
}
Using an API Key and username to authenticate REST requests
When using an API key and username to access a Verint Community site from your application, the application is responsible for storing the valid username and API key and passing that information along to the Verint Community site. When doing this each user accessing the REST API requires an API key. A service account van also be used to limit maintenance overhead for permissions. This requires the application to only need to store valid usernames and on the request, to authenticate using the service account API key and username. An impersonation header, which would contain the username of the user being impersonated, would then be added to the HTTP header.
Generate a platform API key
- While logged in, click on "Settings" at the top right to go to your settings page
- Click on the "Site Options" tab and scroll to the bottom
- Click on "Create and Edit Application Keys"
- Fill in a "name" for the key, such as "admin-key"
- Copy or take note of the generated key.
Authenticating using an API key
To authenticate using an API token the heading Rest-User-Token must be passed. The Rest-User-Token is a user token identifying the user accessing the REST API. It is a base64-encoded concatenation of the user's API key, a colon, and the user's username.
Here is a sample implementation of a REST API GET request using the Rest-User-Token:
var request = WebRequest.Create("https://mytelligentcommunitysite.com/api.ashx/v2/info.json") as HttpWebRequest;
request.Method = "Get";

// replace the "admin" and "Admin's API key" with your valid user and apikey!
var adminKey = String.Format("{0}:{1}", "Admin's API key", "admin");
var adminKeyBase64 = Convert.ToBase64String(Encoding.UTF8.GetBytes(adminKey));

request.Headers.Add("Rest-User-Token", adminKeyBase64);

var response = request.GetResponse() as HttpWebResponse;
Impersonating a user when authenticating using an API key
If the user defined by the Rest-User-Token header has the permission to impersonate other users, the Rest-Impersonate-User header can be set to the username of the user that should be impersonated. When impersonating, any action performed via the REST API is done on behalf of the impersonated user.
Here is a sample implementation of a REST API GET request using Rest-User-Token and Rest-Impersonate-User:
var request = WebRequest.Create("https://mytelligentcommunitysite.com/api.ashx/v2/info.json") as HttpWebRequest;
request.Method = "Get";

// replace the "admin" and "Admin's API key" with your valid user and apikey!
var adminKey = String.Format("{0}:{1}", "u9rsrtkgfmt9qtqgct2fi9acc8zl8g", "admin");
var adminKeyBase64 = Convert.ToBase64String(Encoding.UTF8.GetBytes(adminKey));


request.Headers.Add("Rest-User-Token", adminKeyBase64);

// Add the impersonation header.  Replace the "RandomUser" with the username of the user you are impersonating.
request.Headers.Add("Rest-Impersonate-User", "RandomUser");

var response = request.GetResponse() as HttpWebResponse;
Security Considerations for API Keys
API keys is by far the easiest solution to implement, but it is also the least secure. For one thing, API keys do not expire and rely on a user to delete the key before it becomes unusable. Furthermore when using an API on an account capable of impersonation, anyone with that key is capable of impersonating other users. Because the API key is sent as a header, it is susceptible to being intercepted if not used on a secure(HTTPS) connection.
While they are not deprecated or obsolete, API keys are considered a legacy feature and the recommendation is to not use them for production code. Generally it is recommended that API keys are used only in maintenance or utility applications when OAuth is not a reasonable option.

