
Community has built-in support for CDN delivery of globally-accessible files (accessible to the anonymous user) served from the Centralize File System (CFS).
When the CFS generates a URL to the file (either via a direct URL request or within the generic CFS file handler), it determines if the file is globally accessible . If the file is accessible and the file store has a delivery provider enabled, the delivery provider is asked for a delivery URL. If the delivery provider returns a URL, the CFS will return this URL (or redirect to it through the generic handler).
This means that most supporting files (widget/theme javascript, stylesheets, avatars, etc) as well as publicly accessible embedded files can be routed to a CDN while leaving the dynamic and secured content for Community to handle directly. By utilizing a CDN, the client browser can double the number of concurrent HTTP requests to optimize load times and edge-server distribution of supporting files further decreases client load times and decreases bandwidth requirements on the Community installation.
Default Delivery
Out of the box, Community allows usage of Amazon's CloudFront, Azure CDN, or Fastly.com via configuration in connectionStrings.config:
<?xml version="1.0" encoding="utf-8"?>
<connectionStrings>
	<add name="SiteSqlServer" connectionString="{DB_CONNECTION_STRING}" />
	<add name="FileStorage" connectionString="~/filestorage/" />
	<add name="SearchContentUrl" connectionString="{SEARCH_URL}" />
	<add name="SearchConversationsUrl" connectionString="{CONVERSATION_SEARCH_URL}" />
	<add name="Reporting" connectionString="{REPORTING_DB_CONNECTION_STRING}" />
	<add name="SiteUrl" connectionString="{SITE_URL}" />
	<add name="FileDelivery" connectionString="provider=CloudFront;url={CDN_BASE_URL};includeOriginPath=false"/>
	<!-- <add name="FileDelivery" connectionString="provider=Azure;url={CDN_BASE_URL};includeOriginPath=false"/> -->
	<!-- <add name="FileDelivery" connectionString="provider=Fastly;url={CDN_BASE_URL}"/> -->
</connectionStrings>
With the default provider, any host-prefix-based CDN can be used. The CDN must be configured to pass-through Origin and Access-Control-Request-Headers HTTP headers and GET and OPTIONS HTTP request methods (this appears to be the default for Azure CDN and Fastly.com at the time of this writing, but requires additional configuration of caching behaviors for Amazon CloudFront).
When includeOriginPath is set to false (default: true), the root of the CDN URL will be expected to point to the community's cfs-file/__v/ folder (set via defining the origin path option of the CDN). This is useful if the CDN will only be used to server CFS files as it scopes the CDN to this sub-folder which is only used for CDN-hosted CFS files. If includeOriginPath is set to true (or left as its default), other precautions should be made to ensure that paths outside of cfs-file/__v/ are not cached/processed by the CDN.
If the FileDelivery connection string is not present or empty, files will be served from the directly CFS.
Configuring Amazon CloudFront
Creating a CloudFront Distribution
- Go to Amazon Management Console for CloudFront and create a distribution.
- Configure the following required values for each section during the initial setup.
- Origin
- Origin Domain: Enter your community's domain.
- Origin Path: /cfs-file/__v
- Protocol
- HTTPS only
- Minimum origin SSL protocol: TLSv1.2
- Default Cache Behavior
- Allowed HTTP Methods: GET, HEAD and OPTIONS
- Restrict Viewer Access: No
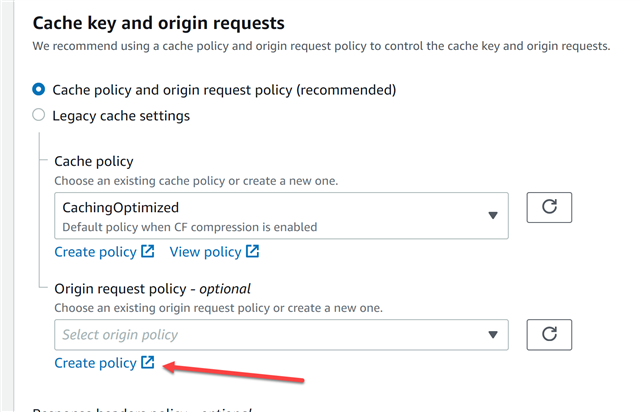
- Cache key and origin requests
- Cache policy: CachingOptimized
- Settings
- Price class - Choose best for you community needs
- Origin
- Save the distribution.
- On the CloudFront Distributions page, click the newly created distribution and click the Behaviors tab.
- Select the existing behavior and click 'Edit'. In the 'Cache Key and origin requests' section, click 'Create Policy'
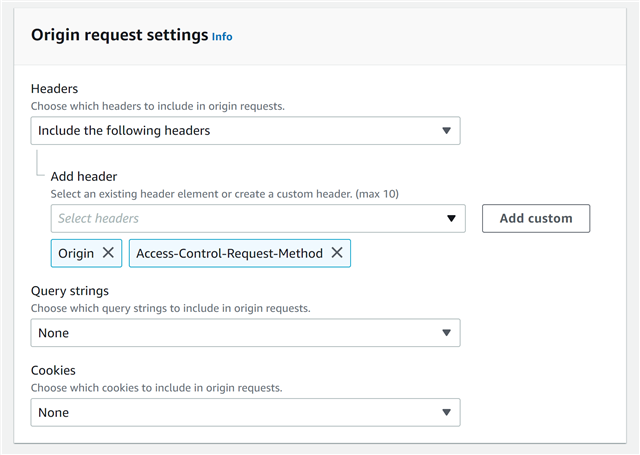
- Create a new policy that includes the 'Origin' and 'Access-Control-Request-Method' headers. Cookies and Query strings should be set to 'None'
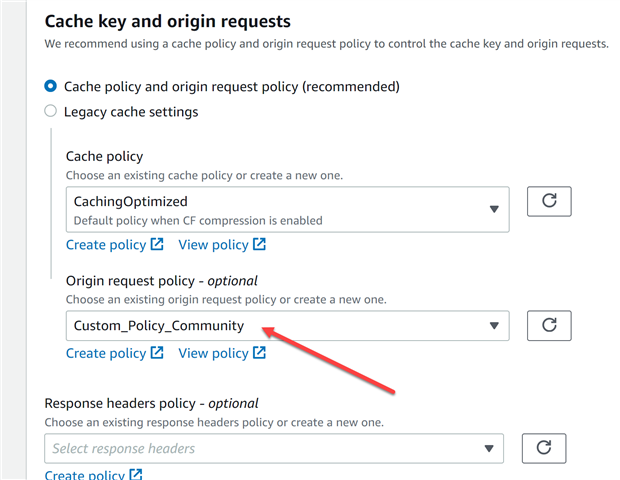
- Set the Behavior's 'Origin request policy' to use the newly created policy.
- Done. Now its time to configure your community to use the CDN.
Configuring Community to use CloudFront CDN
- Go to Amazon CloudFront and copy the distribution domain for your distribution.
- For each server, edit the connectionstrings.config file and add/edit the 'FileDelivery' section. Set 'url' to your CDN domain and 'includeOriginPath' to 'false'. For example,
<add name="FileDelivery" connectionString="provider=CloudFront;url=https://d3l9ca1m5ckp7e.cloudfront.net;includeOriginPath=false"/>
- Save the changes.
- Restart all nodes.
- Refresh the UI cache by going to Administration -> About -> More -> Expire User Interface Caches.