
When working on widgets within a team or on a redistributable set of work, it is beneficial to make use of Verint Community platform services to make development, versioning, and deployment easier.
Making Development and Deployment Easier
To make development easier, you can leverage the same functionality used by the core components of Verint Community, specifically:
- A factory default widget provider. Factory default widget providers enable widget source to be stored on the file system. This makes source management within a system such as SVN, Git, or TFS possible which better enables development within a team.
- Developer Mode. Developer mode is a feature of Verint Community that enables developers to work on factory default widgets within the platform widget editor while saving directly to the file system (to enable source control).
- Automatic installation of source files. Using an IInstallablePlugin implementation along with the widget versioning support in the UI automation APIs and embedded resources enable a complete installation story for custom widgets deployed as part of a factory default provider.
Let's look at a sample implementation and then talk through the details of leveraging these capabilities.
Implementation
A sample implementation of this approach is available on GitHub:

This implementation contains two projects: Samples and FactoryDefaultWidgetFileManifestUpdater. The Samples project identifies the factory default widget provider against which widgets can be created. This particular implementation also includes support for automatic file installation and developer mode considerations. The FactoryDefaultWidgetFileManifestUpdater is a utility console app, suitable for use on a build server, that packages widgets created in Verint Community with the Samples project for deployment as a single installable DLL.
Sample Factory Default Widget Provider Implementation
The sample factory default provider is a plugin to Verint Community. It provides a container for storing factory default widgets on the file system by implementing IScriptedContentFragmentFactoryDefaultProvider. It also implements IInstallablePlugin to enable installing the source of all widgets associated to the factory default provider from embedded resources in the release build of the project.
Instead of reviewing all of the source code, let's instead review the unique areas and discuss why they are implemented the way they are.
The Factory Default Widget Provider Identifier
// the provider ID should be updated to be unique (with Developer Mode enabled, go to Administration > Development >  Generate GUID to get a new GUID)
private readonly Guid _providerId = new Guid("fa801aba-84a0-4746-92cc-b418a7106c0b");
Note at the top of the FactoryDefaultWidgetProvder.cs file the comment about updating the readonly identifier in this file. This is the identifier that should be unique to your implementation. The sample is implemented as a sample without a compiled version because it requires modification and custom building to be used. Generally, a factory default widget provider would be included with other functionality, such as custom content types or custom widget extensions. At a minimum, this identifier should be updated.
Developer Mode Considerations
To better support developer mode, where developers can edit their factory default widgets within the Verint Community UI, a few considerations need to be made to the implementation of the factory default widget provider.
private Version _emptyVersion = new Version(0, 0, 0, 0);
#if DEBUG
    private Version _version = new Version(0, 0, 0, 0);
#else
    private Version _version = null;
#endif
IInstallablePlugins are installed whenever the plugin's version changes, however, when developing widgets, you do not want to install any widget source files as these installed files would overwrite your in-development versions. To account for this conflict of functionality, we'll make use of compile-time conditions and preset versions.
When in debug-mode build, developer mode can be enabled. In this situation, the plugin will always identify a version of 0.0.0.0 which is also the default version value. When the version is set to 0.0.0.0, we bypass the version determination logic:
public Version Version
{
    get
    {
        if (_version == null)
        {
            // only executed when the version isn't preset to 0.0.0.0
        }

        return _version;
    }
}
and bypass the installation process:
public void Install(Version lastInstalledVersion)
{
    if (Version == _emptyVersion)
        return;

    // Normal installation logic...
}
These changes ensure that while using developer mode, you'll never accidentally overwrite our widget source with a previous-built version of the widget package.
Support for Installation and Version Review
Verint Community 9 includes support for reviewing changes made to widgets by end-users. When a new version of a factory default is available, the platform can version the existing implementation of the widget (whether or not it is customized pre-upgrade), update the underlying version of the factory default to the latest, and provide a review process post-upgrade to opt-in or review differences to individual widgets either visually (via the preview panel) or within the widget editor. This sample makes use of this process within the IInstallablePlugin implementation.
When in a release build, the version is left unset until first accessed:
private Version _emptyVersion = new Version(0, 0, 0, 0);
#if DEBUG
    private Version _version = new Version(0, 0, 0, 0);
#else
    private Version _version = null;
#endif
Then, when accessed, we'll determine the latest file version based on the newest/greatest version from the file manifest (the file manifest is described later, but it is a programmatic, versioned listing of embedded files that should be installed):
public Version Version
{
    get
    {
        if (_version == null)
        {
            Version version = _emptyVersion;

            foreach(var file in FactoryDefaultWidgetFileManifest.Files().Where(x => x.WidgetProviderId == ScriptedContentFragmentFactoryDefaultIdentifier))
            {
                if (file.LastModifiedVersion > version)
                    version = file.LastModifiedVersion;
            }

            _version = version;
        }

        return _version;
    }
}
Then, when the version is different than what is currently installed (either because it is the first time this plugin is enabled or an update has been installed), the embedded files are installed within the Install() method:
public void Install(Version lastInstalledVersion)
{
    if (Version == _emptyVersion)
        return;

    var files = FactoryDefaultWidgetFileManifest.Files().Where(x => x.WidgetProviderId == ScriptedContentFragmentFactoryDefaultIdentifier).ToList();

    DetectedDeletedProviderFiles(files);

    // detect upgrade changes and version widgets appropriately for post-upgrade review (or just install all of the files if this isn't an upgrade)
    var message = ContentFragments.UpdateScriptedContentFragments(
        lastInstalledVersion,
        files.Select(x => x as IInstallableFile).ToList()
        );

    // if this was an upgrade, identify the upgrade as complete and provide a way to review widgets (if any were modified as part of the upgrade)
    if (lastInstalledVersion > _emptyVersion)
    {
        // identify that the plugin was upgraded and provide the note to review widget changes, if there was one
        Apis.Get<ISystemNotifications>().Create(
            string.Concat(Name, " Upgraded"),
            string.Concat("<p>", Name, " has been upgraded to ", Version.ToString(), ".</p>", message ?? "")
            );
    }
}
This installation requires a few steps:
- Load the file manifest. Specifically, only the files in the manifest affecting this factory default provider are retrieved (the sample can be expanded to support more than one factory default provider, if necessary).
- Determine deleted files. To find deleted files, we use the
DetectedDeletedProviderFiles()method to compare the currently installed file list against the file manifest. Anything that is currently installed but not in the latest manifest is assumed to be deleted. - Upgrade the files. To do this, we use our modified manifest (the list of embedded files combined with the list of deleted files) and provide it to the ContentFragments.UpdateScriptedContentFragments() UI Automation API. This API will version any existing implementation of modified source files and then install the updated factory default files. Any changes that are found are returned in an HTML-formatted message returned from the method that can be provided to site administrators to review widget updates and approve/deny them.
- Send the upgrade message. If the plugin is an upgrade (and not an initial installation), an upgrade system notification is sent using the ISystemNotifications.Create() API to notify system administrators that the plugin has been upgraded successfully and, if there are any widget changes, provide the review message.
Factory Default Widget File Manifest Updater
The manifest updater is a console application that can be used when packaging the Sample project for deployment. The console app updates the file manifest used by the Sample factory default widget provider's installation process and ensures that sources files are embedded in the resulting DLL. This console app should be executed before building the Samples project in release mode for deployment.
Using the Sample
Using the sample is slightly different for development and deployment
Development with the Sample
Incorporate the Sample In Your Project
Generally, a factory default widget provider is used to expose other custom functionality implemented using plugins. This sample should then be incorporated into the same project so all of the components are distributed together. If this project is used only for widget source file management, the namespace, project name, and assembly name should at least be updated.
Update the Factory Default Provider ID
Once the project source is in a good location, generate a new GUID for the factory default provider identifier. The value in the sample should not be used. To generate a GUID in developer mode, go to Administration > Development > Generate GUID and copy the generated GUID. Update the _providerId GUID on line 17 of FactoryDefaultWidgetProvider.cs (or wherever this code gets relocated within an existing project).
Update Project References
To use the sample, the project will need to have valid references to Telligent.Evolution.Api.dll, Telligent.Evolution.Components.dll, and Telligent.Evolution.ScriptedContentFragments.dll -- all DLLs that are part of the Verint Community platform.
Build and Deploy
Ensure that you are building the project in Debug mode. Build the project and deploy the resulting DLL to a development instance of Verint Community (if your development instance contains multiple instances of the platform, install the DLL in each instance... for example, each web node and job scheduler node).
Enable the Plugin
Within Verint Community, enable the plugin. Go to Administration and search for the name of the plugin (the sample is called "Sample Widgets"). Click to view the plugin, check the enabled box, and save.
Develop Widgets
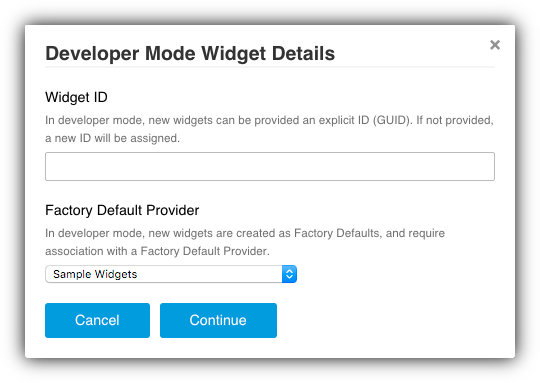
Within the widget editor at Administration > Interface > Widgets, with developer mode enabled, you should be able to create a new widget by clicking the  icon. Within the Developer Mode Widget Details modal, select the name of your factory default provider, for example, "Sample Widgets":
If you don't see your sample widget provider, you can go to Administration > Development > Expire Caches and select Expire All Caches, then try again.
After clicking Continue on the Developer Mode Widget Details modal, you will have created a new staged widget within your factory default provider. You can then develop the widget normally. When you save, the widget will be saved to the file system where you've configured the centralized file system, by default,
Web\filestorage\defaultwidgets\{FACTORY_DEFAULT_PROVIDER_ID}
where {FACTORY_DEFAULT_PROVIDER_ID} is the ID you provided as the factory default provider ID when you customized the sample implementation. This is the folder that you'll also want to add to your source control/management system. Any files within this folder are sources files used to implement the widgets associated to the factory default. As you develop widgets, you'll want to commit any changes to this folder (new files, edited files, deleted files) to your source management solution.
Building a Deployment Package
Once you have developed the widgets as part of your factory default widget provider implementation, you can package the plugin and the widget source files for deployment. To do this,
Setup Your Build Environment
Your build environment should not be the same as your development environment. Ideally, this step would be performed as part of a continuous integration process. It could also be performed carefully within a second local instance of your provider implementation.
Get the Latest Source
Load the latest implementation of the plugin source and the widget source from your source management solution. These two collections of source files should be in separate folders (one should not be within the other).
Execute the FactoryDefaultWidgetFileManfiestUpdater console app. Specifically, execute:
FactoryDefaultWidgetFileManifestUpdater.exe /proj:"{FULL_PROJECT_PATH}" /providerid:{WIDGET_PROVIDER_ID} /cfs:"{FULL_CFS_PATH}" /out:"{PATH_TO_MANIFEST_CLASS}"
Where the following tokens are replaced:
{FULL_PROJECT_PATH} |
The full local path to the Samples.csproj project file. |
{WIDGET_PROVIDER_ID} |
The GUID representing the Samples factory default provider (specified in the FactoryDefaultProvider.cs file in the Samples project). |
{FULL_CFS_PATH} |
The full local path to the root CFS folder (Web/filestorage/, for example) containing the source of the widgets for this factory default provider. This should not be located within the Samples project's folder structure. |
{PATH_TO_MANIFEST_CLASS} |
The full local path to the FactoryDefaultWidgetFileManifest.cs file in the Samples project. |
Build the Deployment Package
Ensure that the sample project is set to be built in release mode and build the project. The resulting DLL will include all of the widget source files along with the manifest and will be built to enable widget source file installation. This DLL can now be deployed.
Installing the Deployment Package
To install the deployment package,
Install the Package DLL
Install the resulting deployment package DLL into each instance of the Verint Community platform (each web and job server node). Note that you should not install the deployment package on a development site since you will overwrite any widgets in development.
Enable the Plugin
If the plugin had not yet been enabled, enable it by going to Administration and search for the name of the plugin (the sample defaults to "Sample Plugins"). Select the matching plugin, check to enable it, and save the plugin.
Review the Upgrade Note
If this was the first enablement of the plugin, no notification will be sent, but the widgets should be installed and be available for use.
If the plugin is updated, a notification should be sent to administrators of the site:

If the update included any changes to widgets, those widgets will have been versioned and the review text in the sample above will be shown. Clicking Review Widget Updates will start the widget review process where modified widgets are listed and available for preview, review, and editing before being published to the community.
Download/Fork Source
The source for this example is available on GitHub at https://github.com/Telligent/Widget-Source-Management-Sample