
Templating is designed primarily as a way to allow non-coders to make changes to the content and layout of text communications from Verint Community without having to access and alter any code. It is similar in functionality to Translations, but while translations can only be static text that is the same every time it is used, templates are designed to include data to customize the message based on context, such as inserting the username and title of content in a notification about creating content. The ITemplatablePlugin interface allows you to define and (via the template editor in Administration) edit templates for use by your plugin.
Why/When Should I Use Templates?
Templating is the accepted method within Verint Community to include any dynamic data in any communication generated by Verint Community, while maintaining the ability to customize/alter the content on the fly within the Administration UI, and while respecting the possibility of translating the communication to be sent to more than one locality. While templating can be used for many different purposes, the most prominent use case is for sending emails.
Understanding Template Context
Templates are designed to be generic - you design once and can reuse it many times, because you can identify exactly what can be the same every time the template is sent, and what needs to be different. In other words, you create the overall design while leaving "holes" for your data to be filled in later. However, because of that, the template cannot be used by itself unless it has some data to plug in. Verint Community calls this data the template's Context. Whenever a template is being rendered, a TemplateContext is required, and it must have the data the template engine is looking for to fill in the "holes". A TemplateContext is essentially a blind dictionary; objects are stored keyed by Guids. Plugins registering tokens are responsible for specifying what object they need in the context by specifying its id; Plugins rendering templates are responsible for generating the context and populating it with the ids and object types the tokens expect.
Allowing Your Plugins to Utilize Templates
When you want a plugin to be able to utilize the functionality of templates, you should implement ITemplatablePlugin. Common usages would be for notification and email templates, or any other plugin you create that may send messages to your users and where you may wish to include data unique to the current context/reason for sending that message.
Similar to Plugin Translations, templates need a controller to access retrieving and rendering functionality. Then they need an initial declaration of - in this case - the templates. You can set up a default template in as many languages as necessary. In defining the template, you specify an id, Name, Description, and a set of ContextualDataTypeIds. These contextual data type ids correspond to the type of data your template will be working with. If you are creating a notification about a blog post, for instance, you would specify the Blog Post Data Type Id. This would also give access to other objects and their properties that would be exposed from the Blog Post object - for instance, the Blog Post's Blog, Group, or Author.
private ITemplatablePluginController _controller;
public void SetController(ITemplatablePluginController controller)
{
    _controller = controller;
}

private TokenizedTemplate[] _defaultTemplates;
public TokenizedTemplate[] DefaultTemplates
{
    get
    {
        if (_defaultTemplates == null)
        {
            var myTemplate = new TokenizedTemplate("body")
            {
                Name = "Template Body",
                Description = "Sample template",
                ContextualDataTypeIds = new[]
			    {
				    PublicApi.BlogPosts.ContentTypeId
			    }
            };
            myTemplate.Set("en-us", @"");

            _defaultTemplates = new[] { myTemplate };
        }
        return _defaultTemplates;
    }
}
A note about ContentTypeId vs DataTypeId: each token category needs a unique id to represent when to include those tokens in the token selection list in the template editor. Because some of these tokens are for Content Types such as blog posts, the ContentTypeId was reused in these cases. For tokens that are not for a Content Type - for instance, likes or mentions - a new Id was created and referred to as a DataTypeId.
In order to actually utilize the template engine, you need to create a context and populate it with the information the template will need. While there are various ways to do this, for our sample we will use the method of handling an event and then generating an email from that. You can learn more about Events at Handling Events.
// Register to handle the event in the IPlugin Initialize() method.
public void Initialize()
{
    Apis.Get<IBlogPosts>().Events.AfterCreate += BlogPost_AfterCreate;
}
When handling the event, we fetch the blog post in question, create a context with that blog post, render the templates with that context, and then send an email using those rendered templates.
void BlogPost_AfterCreate(BlogPostAfterCreateEventArgs e)
{
    BlogPost post = Apis.Get<IBlogPosts>().Get(e.ContentId);

    var context = new TemplateContext { PostTarget = "Email" };
    context.AddItem(PublicApi.BlogPosts.ContentTypeId, post);

    string renderedSubject = _controller.RenderTokenString("subject", context);
    string renderedBody = _controller.RenderTokenString("body", context);

    Apis.Get<ISendEmail>().Send(new SendEmailOptions
        {
            Subject = renderedSubject,
            Body = renderedBody,
            ToEmail = "recipient@test.com"
        });
}
Note that there are better ways to integrate your plugin with Verint Community's notification architecture; this is just a sample of working with rendered templates that sends a one-off email. See Notifications for more information on setting up your plugin as a Notification Type.
Using The Template Editor
At this point, both templates we have defined are blank. It is extremely highly recommended to work on creating templates using the template editor tab when configuring the plugin in Administration, so at this point the existing sample plugin can be compiled and placed into the Verint Community /bin folder. After recycling the app pool, you can search for your plugin in Administration in order to edit it. The plugin configuration will have a Templates tab, and you can see selections for template and language. The options here will correspond to the template names you have declared in your plugin, and to the installed languages in your Verint Community site.

From here you can create your template with the content editor used throughout Verint Community. An additional option is available for template-enabled editors under Insert > Insert token.

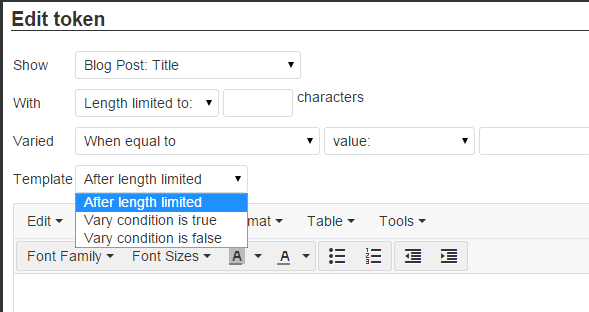
This presents additional options for selecting a token and specifying a few extra options based on the token type. You have the choice of limiting the token output to a certain length ("With > length limited to..."). This can be useful for content body tokens, to ensure some spacing limits and to draw users to your site to view the rest of the content. You can also choose, instead of directly rendering the token output to the template, to compare it to either a hard-coded value or the output of another tokenized template. This can be very useful for non-text tokens like Type Ids and Counts, to alter certain portions of the template based on what type a content is, or to hide certain parts of the template if a count is 0. Each of these settings add potential new subtemplates: Truncation allows you to add something (like an ellipsis or a "More" link) after the text is truncated, and the Comparison give you two different options for what to show if the comparison is either true or false. Note that these templates can also be left blank if desired.
There are also additional subtemplates available when selecting DataTypeContainer or Enumerable tokens. (See Registering Tokens For Templates for more information on token types.) For instance, selecting "Blog Post: Blog" will give you a subtemplate named Content. This is essentially a new section of the base template, but one that now has access to tokens related to Blogs (as opposed to just blog posts). You can now use Insert > Insert token in this subtemplate to insert a blog token. This will create another nested selection modal. Keep in mind where in the template you are, as the nested modals can be confusing. You can always click "Ok" to save changes, or "Cancel" to discard them, on each successive selection modal.
When you enable the plugin and click "Save", the current template version is saved as the customization to the base default template. The "Revert Templates To Default" button will remove any customization and restore the default template (Which in this case would be the blank templates originally defined in the plugin.)
Adding The Created Template Back To Your Plugin
Once you have created templates in the editor, you can export them back to your plugin to make them the defaults. This can be useful as a base point if you need to make temporary changes to a template or if you are distributing a plugin for others to use. Once you've defined the default template content by hard-coding it into the plugin template declaration, the Revert Templates button will revert any customizations back to this original default.
First we will need to export the template(s). The template export is grouped with the translation export. Go to Administration > Translation > Plugin Translations and click "Export Resources".
In the downloaded file, find your plugin by searching its name or type.
Copy the entire <template> node for each template you are adding back to your plugin.

One text transformation is needed before inserting the template into your plugin code. To properly escape the string, each double quote (") needs to be replaced by two double quotes (""). A simple Find and Replace should be able to accomplish this.
The template contents can then be added to your plugin.
body.Set("en-us",
@"<template id=""body"" name=""Template Body"" description=""Sample template"">
<source><p>A blog named ${token:68cae091-3fe4-434a-8ad3-9d522cf19e19} was created.</p></source>
<fragments />
</template>");